
Ansible for Beginners 2026: Complete Guide to IT Infrastructure Automation

Table of Contents
Ansible for Beginners: Complete 2026 Guide to IT Automation
Ansible has evolved into the industry-leading automation platform, trusted by over 80% of Fortune 500 companies for managing complex IT infrastructure. In 2026, Ansible continues to dominate the automation landscape, offering unparalleled simplicity combined with enterprise-grade power.
This comprehens guide will take you from complete beginner to confident Ansible user, covering everything from basic concepts to advanced techniques, real-world use cases, and best practices for 2026.
What is Ansible? Understanding the Fundamentals
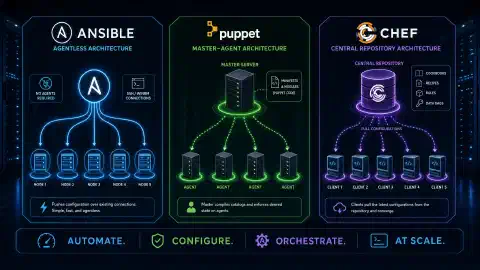
Ansible is an open-source automation platform that simplifies IT infrastructure management through agentless, declarative automation. Unlike traditional configuration management tools, Ansible doesn’t require agents installed on managed nodes - it uses SSH (Linux/Unix) or WinRM (Windows) for remote management.
Key Characteristics of Ansible
1. Agentless Architecture:
- No software installation required on managed nodes
- Uses existing SSH or WinRM protocols
- Reduces attack surface and maintenance overhead
- Easier to get started compared to agent-based tools
2. Declarative Language (YAML):
- Human-readable configuration files
- Infrastructure described as desired state
- Idempotent operations (safe to run multiple times)
- Easy for non-programmers to understand
3. Push-based Model:
- Control node pushes configurations to managed nodes
- Immediate execution without waiting for agents
- Centralized control and visibility
- Works well for on-demand automation
4. Extensive Module Library:
- 5,000+ built-in modules (as of 2026)
- Covers Linux, Windows, network devices, cloud platforms
- Community and vendor-developed modules
- Easy to write custom modules in Python
What Can Ansible Automate?
Ansible excels at automating:
- Configuration Management: Maintain consistent server configurations
- Application Deployment: Deploy applications across environments
- Provisioning: Create and configure infrastructure
- Continuous Delivery: Integrate with CI/CD pipelines
- Security & Compliance: Enforce security policies and compliance
- Orchestration: Coordinate complex multi-tier deployments
- Cloud Automation: Manage AWS, Azure, GCP, and other clouds
- Network Automation: Configure switches, routers, firewalls
- Windows Automation: Manage Windows servers and workstations
Ansible’s Evolution: 2012 to 2026
Timeline:
- 2012: Michael DeHaan creates Ansible
- 2015: Red Hat acquires Ansible
- 2019: Ansible Engine 2.8 introduces Collections
- 2020: Ansible 2.10+ splits into ansible-core + collections
- 2023: Ansible 8.x with enhanced cloud integrations
- 2026: Ansible 10.x with AI-assisted playbook generation, improved Windows support, and enhanced security features
Ansible vs Competitors: Quick Comparison
| Feature | Ansible | Terraform | Puppet | Chef |
|---|---|---|---|---|
| Type | Configuration Management | Infrastructure Provisioning | Configuration Management | Configuration Management |
| Language | YAML | HCL | Puppet DSL (Ruby-like) | Ruby DSL |
| Agent Required | No | No | Yes | Yes |
| Learning Curve | Easy | Moderate | Steep | Steep |
| Best For | Config management, deployment | Cloud infrastructure | Large enterprise | Complex workflows |
| State Management | Push-based | Declarative state file | Pull-based | Pull-based |
| Windows Support | Excellent (2026) | Limited | Good | Good |
| Community Size | Very Large | Very Large | Large | Moderate |
| Primary Use Case | Day-2 operations | Day-1 provisioning | Enterprise config | Application deployment |
When to Choose Ansible:
- ✅ Configuration management across hybrid environments
- ✅ Application deployment automation
- ✅ Quick learning curve required
- ✅ Agentless architecture preferred
- ✅ Strong Windows automation needs (2026 improvements)
- ✅ Existing SSH infrastructure
When to Consider Alternatives:
- Terraform: Pure infrastructure provisioning (AWS, Azure, GCP)
- Puppet: Large-scale enterprise with thousands of nodes
- Chef: Complex application-centric workflows
Getting Started: Installing Ansible 2026
System Requirements
Control Node (where Ansible runs):
- Linux, macOS, or WSL2 on Windows
- Python 3.9 or later (Python 3.11+ recommended for 2026)
- 2 GB RAM minimum, 4 GB+ recommended
- 5 GB disk space for collections
Managed Nodes:
- SSH access (Linux/Unix) or WinRM (Windows)
- Python 2.7 or Python 3.6+ (Linux)
- PowerShell 5.1+ (Windows)
- No agent installation required
Installation Methods
Method 1: Package Manager (Recommended for Beginners)
Ubuntu/Debian:
# Add Ansible PPA for latest version
sudo apt-add-repository ppa:ansible/ansible
sudo apt update
sudo apt install ansible -y
RHEL/CentOS/Rocky Linux:
# Enable EPEL repository
sudo dnf install epel-release -y
sudo dnf install ansible -y
macOS:
# Using Homebrew
brew install ansible
Method 2: Python pip (Latest Features)
# Install pipx (recommended isolated environment)
python3 -m pip install --user pipx
python3 -m pipx ensurepath

# Install Ansible using pipx
pipx install --include-deps ansible

# Verify installation
ansible --version
Method 3: Docker (Portable)
# Pull official Ansible container
docker pull quay.io/ansible/ansible:latest

# Run Ansible in container
docker run --rm -it quay.io/ansible/ansible:latest ansible --version
Verifying Installation
# Check Ansible version
ansible --version

# Expected output (2026):
# ansible [core 2.16.5]
#   config file = /etc/ansible/ansible.cfg
#   python version = 3.11.8
#   jinja version = 3.1.3
Initial Configuration
Create Ansible configuration file:
# Create config directory
mkdir -p ~/.ansible

# Create ansible.cfg
cat > ~/.ansible/ansible.cfg << 'EOF'
[defaults]
inventory = ~/ansible/inventory
host_key_checking = False
retry_files_enabled = False
gathering = smart
fact_caching = jsonfile
fact_caching_connection = /tmp/ansible_facts
fact_caching_timeout = 3600

[privilege_escalation]
become = True
become_method = sudo
become_user = root
become_ask_pass = False
EOF
Essential Concepts: Building Blocks of Ansible
1. Inventory: Defining Your Infrastructure
An inventory defines the hosts and groups that Ansible manages. Inventories can be static (INI/YAML files) or dynamic (scripts/plugins).
Static Inventory (INI Format)
# inventory/hosts.ini

# Web servers group
[webservers]
web1.example.com
web2.example.com
web3.example.com

# Database servers group
[databases]
db1.example.com ansible_host=192.168.1.100
db2.example.com ansible_host=192.168.1.101

# Load balancers
[loadbalancers]
lb1.example.com

# Group of groups
[production:children]
webservers
databases
loadbalancers

# Variables for all webservers
[webservers:vars]
ansible_user=deploy
ansible_port=22
http_port=80
https_port=443

# Variables for all hosts
[all:vars]
ansible_python_interpreter=/usr/bin/python3
Static Inventory (YAML Format - Recommended 2026)
# inventory/hosts.yml
all:
  vars:
    ansible_python_interpreter: /usr/bin/python3
  children:
    webservers:
      hosts:
        web1.example.com:
        web2.example.com:
        web3.example.com:
      vars:
        ansible_user: deploy
        http_port: 80
        https_port: 443
    databases:
      hosts:
        db1.example.com:
          ansible_host: 192.168.1.100
        db2.example.com:
          ansible_host: 192.168.1.101
      vars:
        ansible_user: dbadmin
    production:
      children:
        webservers:
        databases:
Dynamic Inventory (Cloud Providers)
For cloud environments, use dynamic inventory plugins:
AWS EC2:
# inventory/aws_ec2.yml
plugin: amazon.aws.ec2
regions:
  - us-east-1
  - us-west-2
filters:
  tag:Environment: production
keyed_groups:
  - key: tags.Application
    prefix: app
Azure:
# inventory/azure_rm.yml
plugin: azure.azcollection.azure_rm
include_vm_resource_groups:
  - production-rg
keyed_groups:
  - key: tags.role
    prefix: role
2. Playbooks: Automation Blueprints
Playbooks are YAML files that define automation workflows. They describe the desired state of your infrastructure.
Simple Playbook Example
# simple_playbook.yml
---
- name: Configure Web Servers
  hosts: webservers
  become: yes

  tasks:
    - name: Install Nginx
      apt:
        name: nginx
        state: present
        update_cache: yes
      when: ansible_os_family == "Debian"

    - name: Start and enable Nginx
      service:
        name: nginx
        state: started
        enabled: yes

    - name: Copy website content
      copy:
        src: ./website/
        dest: /var/www/html/
        owner: www-data
        group: www-data
        mode: '0644'

    - name: Configure firewall
      ufw:
        rule: allow
        port: '{{ item }}'
        proto: tcp
      loop:
        - 80
        - 443
Running Playbooks
# Basic execution
ansible-playbook simple_playbook.yml

# With specific inventory
ansible-playbook -i inventory/hosts.yml simple_playbook.yml

# Limit to specific hosts
ansible-playbook simple_playbook.yml --limit web1.example.com

# Dry run (check mode)
ansible-playbook simple_playbook.yml --check

# Verbose output for troubleshooting
ansible-playbook simple_playbook.yml -vvv
3. Modules: Reusable Task Units
Ansible modules are the building blocks of automation. Each module performs a specific task.
Common Modules (2026)
System Modules:
# Package management
- name: Install packages (apt)
  apt:
    name:
      - nginx
      - git
      - python3-pip
    state: present

# Service management
- name: Manage services
  systemd:
    name: nginx
    state: started
    enabled: yes
File Modules:
# File operations
- name: Create directory
  file:
    path: /opt/myapp
    state: directory
    owner: appuser
    mode: '0755'

# Copy files
- name: Deploy configuration
  copy:
    src: config.yml
    dest: /etc/myapp/config.yml
    backup: yes

# Template with variables
- name: Deploy nginx config
  template:
    src: nginx.conf.j2
    dest: /etc/nginx/nginx.conf
  notify: restart nginx
Cloud Modules (AWS Example):
# Create EC2 instance
- name: Launch EC2 instance
  amazon.aws.ec2_instance:
    name: webserver-01
    instance_type: t3.medium
    image_id: ami-0c55b159cbfafe1f0
    region: us-east-1
    vpc_subnet_id: subnet-12345678
    security_group: web-sg
    key_name: my-keypair
    tags:
      Environment: production
      Application: web

# Create S3 bucket
- name: Create S3 bucket
  amazon.aws.s3_bucket:
    name: my-app-bucket
    region: us-east-1
    versioning: yes
    encryption: AES256
Database Modules:
# MySQL database management
- name: Create MySQL database
  mysql_db:
    name: webapp_db
    state: present
    login_user: root
    login_password: "{{ mysql_root_password }}"

- name: Create MySQL user
  mysql_user:
    name: webapp_user
    password: "{{ db_password }}"
    priv: 'webapp_db.*:ALL'
    state: present
4. Variables: Making Playbooks Flexible
Variables make playbooks reusable across different environments.
Variable Precedence (Highest to Lowest)
- Extra vars (
-eon command line) - Task vars
- Block vars
- Role and include vars
- Play vars
- Host facts
- Playbook host_vars
- Playbook group_vars
- Inventory host_vars
- Inventory group_vars
- Role defaults
Variable Examples
Playbook Variables:
---
- name: Deploy Application
  hosts: webservers
  vars:
    app_name: myapp
    app_version: 2.5.0
    app_port: 8080

  tasks:
    - name: Deploy {{ app_name }} version {{ app_version }}
      docker_container:
        name: "{{ app_name }}"
        image: "registry.example.com/{{ app_name }}:{{ app_version }}"
        ports:
          - "{{ app_port }}:8080"
group_vars (Environment-Specific):
# group_vars/production.yml
app_environment: production
db_host: prod-db.example.com
db_port: 3306
log_level: warning
max_connections: 1000

# group_vars/development.yml
app_environment: development
db_host: dev-db.example.com
db_port: 3306
log_level: debug
max_connections: 100
Ansible Vault (Encrypted Variables):
# Create encrypted file
ansible-vault create secrets.yml

# Edit encrypted file
ansible-vault edit secrets.yml

# secrets.yml content:
# db_password: supersecret123
# api_key: abc123xyz789

# Use in playbook
ansible-playbook deploy.yml --ask-vault-pass
5. Roles: Organizing Complex Automation
Roles provide a structured way to organize playbooks, making them modular and reusable.
Complete Role Structure
roles/
└── nginx/
    ├── defaults/
    │   └── main.yml          # Default variables
    ├── vars/
    │   └── main.yml          # Role variables
    ├── tasks/
    │   ├── main.yml          # Main task list
    │   ├── install.yml       # Installation tasks
    │   └── configure.yml     # Configuration tasks
    ├── handlers/
    │   └── main.yml          # Handlers (restart services)
    ├── templates/
    │   ├── nginx.conf.j2     # Jinja2 templates
    │   └── site.conf.j2
    ├── files/
    │   └── custom_module.sh  # Static files
    ├── meta/
    │   └── main.yml          # Role dependencies
    └── README.md             # Documentation
Example Role: nginx
defaults/main.yml:
---
nginx_port: 80
nginx_user: www-data
nginx_worker_processes: auto
nginx_worker_connections: 1024
tasks/main.yml:
---
- name: Include OS-specific variables
  include_vars: "{{ ansible_os_family }}.yml"

- name: Install Nginx
  include_tasks: install.yml

- name: Configure Nginx
  include_tasks: configure.yml

- name: Ensure Nginx is running
  service:
    name: nginx
    state: started
    enabled: yes
tasks/install.yml:
---
- name: Install Nginx (Debian)
  apt:
    name: nginx
    state: present
    update_cache: yes
  when: ansible_os_family == "Debian"

- name: Install Nginx (RedHat)
  yum:
    name: nginx
    state: present
  when: ansible_os_family == "RedHat"
handlers/main.yml:
---
- name: restart nginx
  service:
    name: nginx
    state: restarted

- name: reload nginx
  service:
    name: nginx
    state: reloaded
templates/nginx.conf.j2:
user {{ nginx_user }};
worker_processes {{ nginx_worker_processes }};

events {
    worker_connections {{ nginx_worker_connections }};
}

http {
    include /etc/nginx/mime.types;
    default_type application/octet-stream;

    server {
        listen {{ nginx_port }};
        server_name {{ ansible_fqdn }};

        location / {
            root /var/www/html;
            index index.html;
        }
    }
}
Using the Role:
---
- name: Configure Web Servers with Nginx Role
  hosts: webservers
  become: yes

  roles:
    - role: nginx
      vars:
        nginx_port: 8080
        nginx_worker_processes: 4
Advanced Ansible Concepts (2026)
Ansible Collections
Collections are distribution format for Ansible content (modules, roles, plugins).
Installing Collections
# Install from Ansible Galaxy
ansible-galaxy collection install community.general
ansible-galaxy collection install amazon.aws
ansible-galaxy collection install ansible.windows

# Install from requirements file
# requirements.yml:
collections:
  - name: community.general
    version: ">=6.0.0"
  - name: amazon.aws
    version: "5.2.0"

ansible-galaxy collection install -r requirements.yml
Using Collection Modules
---
- name: Use collection modules
  hosts: localhost
  tasks:
    - name: Use docker module from community.general
      community.general.docker_container:
        name: webapp
        image: nginx:latest

    - name: Use AWS EC2 module
      amazon.aws.ec2_instance:
        name: webserver
        instance_type: t3.micro
Ansible Tower / AWX (Enterprise Features)
Ansible Tower (commercial) and AWX (open-source) provide:
- Web-based UI for playbook execution
- Role-based access control (RBAC)
- Job scheduling and workflows
- Centralized logging and auditing
- REST API for integration
- Credential management
- Inventory synchronization
AWX Installation (Docker Compose):
# Clone AWX repository
git clone https://github.com/ansible/awx.git
cd awx

# Deploy using docker-compose
cd tools/docker-compose
docker-compose -f docker-compose.yml up -d

# Access at http://localhost:80
# Default login: admin / password
Ansible for Windows Automation
Ansible 2026 has significantly improved Windows support:
Windows Prerequisites:
# On Windows host, enable WinRM
$url = "https://raw.githubusercontent.com/ansible/ansible/devel/examples/scripts/ConfigureRemotingForAnsible.ps1"
$file = "$env:temp\ConfigureRemotingForAnsible.ps1"
(New-Object -TypeName System.Net.WebClient).DownloadFile($url, $file)
powershell.exe -ExecutionPolicy ByPass -File $file
Inventory for Windows:
[windows]
win1.example.com

[windows:vars]
ansible_user=Administrator
ansible_password=SecurePassword123
ansible_connection=winrm
ansible_winrm_transport=ntlm
ansible_winrm_server_cert_validation=ignore
ansible_port=5986
Windows Automation Playbook:
---
- name: Windows Server Configuration
  hosts: windows
  gather_facts: yes

  tasks:
    - name: Install IIS
      win_feature:
        name: Web-Server
        state: present
        include_management_tools: yes

    - name: Deploy website
      win_copy:
        src: ./website/
        dest: C:\inetpub\wwwroot\

    - name: Configure firewall
      win_firewall_rule:
        name: Allow HTTP
        localport: 80
        protocol: tcp
        action: allow
        direction: in
        enabled: yes

    - name: Install software via Chocolatey
      win_chocolatey:
        name:
          - googlechrome
          - 7zip
          - notepadplusplus
        state: present
Network Automation with Ansible
Ansible supports major network vendors: Cisco, Juniper, Arista, F5, and more.
Network Device Playbook:
---
- name: Configure Cisco Switches
  hosts: cisco_switches
  gather_facts: no
  connection: network_cli

  vars:
    ansible_network_os: ios
    ansible_user: admin
    ansible_password: "{{ vault_switch_password }}"

  tasks:
    - name: Configure VLANs
      cisco.ios.ios_vlans:
        config:
          - vlan_id: 10
            name: DATA
          - vlan_id: 20
            name: VOICE
          - vlan_id: 30
            name: GUEST
        state: merged

    - name: Configure interface
      cisco.ios.ios_interfaces:
        config:
          - name: GigabitEthernet1/0/1
            description: Uplink to Core
            enabled: true

    - name: Save configuration
      cisco.ios.ios_config:
        save_when: always
Real-World Use Cases and Examples
Use Case 1: Complete Web Application Deployment
Project Structure:
webapp-deployment/
├── ansible.cfg
├── inventory/
│   ├── production
│   └── staging
├── group_vars/
│   ├── all.yml
│   ├── production.yml
│   └── staging.yml
├── roles/
│   ├── common/
│   ├── nginx/
│   ├── postgresql/
│   └── application/
└── playbooks/
    ├── site.yml
    └── deploy.yml
site.yml (Full Stack Deployment):
---
- name: Configure all servers
  hosts: all
  become: yes
  roles:
    - common

- name: Configure database servers
  hosts: databases
  become: yes
  roles:
    - postgresql

- name: Configure web servers
  hosts: webservers
  become: yes
  roles:
    - nginx
    - application

- name: Configure load balancers
  hosts: loadbalancers
  become: yes
  roles:
    - haproxy
Use Case 2: Kubernetes Cluster Setup
---
- name: Setup Kubernetes Cluster
  hosts: k8s_cluster
  become: yes

  tasks:
    - name: Install Docker
      apt:
        name: docker.io
        state: present

    - name: Add Kubernetes apt key
      apt_key:
        url: https://packages.cloud.google.com/apt/doc/apt-key.gpg
        state: present

    - name: Add Kubernetes repository
      apt_repository:
        repo: deb https://apt.kubernetes.io/ kubernetes-xenial main
        state: present

    - name: Install Kubernetes components
      apt:
        name:
          - kubelet=1.28.0-00
          - kubeadm=1.28.0-00
          - kubectl=1.28.0-00
        state: present

- name: Initialize Kubernetes master
  hosts: k8s_master
  become: yes
  tasks:
    - name: Initialize cluster
      command: kubeadm init --pod-network-cidr=10.244.0.0/16
      args:
        creates: /etc/kubernetes/admin.conf

    - name: Create .kube directory
      file:
        path: /home/{{ ansible_user }}/.kube
        state: directory
        owner: "{{ ansible_user }}"

    - name: Copy admin.conf
      copy:
        src: /etc/kubernetes/admin.conf
        dest: /home/{{ ansible_user }}/.kube/config
        remote_src: yes
        owner: "{{ ansible_user }}"
Use Case 3: Security Hardening Automation
---
- name: Security Hardening
  hosts: all
  become: yes

  tasks:
    - name: Update all packages
      apt:
        upgrade: dist
        update_cache: yes

    - name: Install security tools
      apt:
        name:
          - fail2ban
          - ufw
          - aide
        state: present

    - name: Configure fail2ban
      copy:
        src: jail.local
        dest: /etc/fail2ban/jail.local
      notify: restart fail2ban

    - name: Configure firewall
      ufw:
        rule: "{{ item.rule }}"
        port: "{{ item.port }}"
        proto: "{{ item.proto }}"
      loop:
        - { rule: 'allow', port: '22', proto: 'tcp' }
        - { rule: 'allow', port: '80', proto: 'tcp' }
        - { rule: 'allow', port: '443', proto: 'tcp' }
        - { rule: 'deny', port: '3306', proto: 'tcp' }

    - name: Enable firewall
      ufw:
        state: enabled

    - name: Disable root login
      lineinfile:
        path: /etc/ssh/sshd_config
        regexp: '^PermitRootLogin'
        line: 'PermitRootLogin no'
      notify: restart sshd

    - name: Set password policy
      lineinfile:
        path: /etc/login.defs
        regexp: '^PASS_MAX_DAYS'
        line: 'PASS_MAX_DAYS   90'

  handlers:
    - name: restart fail2ban
      service:
        name: fail2ban
        state: restarted

    - name: restart sshd
      service:
        name: sshd
        state: restarted
Best Practices for Ansible (2026 Edition)
1. Use Version Control (Git)
Repository Structure:
ansible-infrastructure/
├── .gitignore
├── README.md
├── ansible.cfg
├── inventory/
├── group_vars/
├── host_vars/
├── roles/
├── playbooks/
└── files/
.gitignore:
*.retry
*.pyc
.vault_pass
secrets.yml
*.log
2. Implement Idempotency
Bad (Not Idempotent):
- name: Add line to file
  shell: echo "new line" >> /etc/myconfig
Good (Idempotent):
- name: Ensure line in file
  lineinfile:
    path: /etc/myconfig
    line: "new line"
    state: present
3. Use Ansible Lint for Code Quality
# Install ansible-lint
pip install ansible-lint

# Run linter
ansible-lint playbook.yml

# Fix common issues automatically
ansible-lint --fix playbook.yml
4. Implement Testing with Molecule
# Install Molecule
pip install molecule molecule-docker

# Initialize new role with tests
molecule init role my_role --driver-name docker

# Run tests
cd my_role
molecule test

# Test stages:
# - Create test environment
# - Converge (run playbook)
# - Verify (run tests)
# - Destroy environment
molecule.yml Example:
---
dependency:
  name: galaxy
driver:
  name: docker
platforms:
  - name: ubuntu2204
    image: geerlingguy/docker-ubuntu2204-ansible:latest
    pre_build_image: true
provisioner:
  name: ansible
verifier:
  name: ansible
5. Use Tags for Selective Execution
---
- name: Full Server Setup
  hosts: webservers
  become: yes

  tasks:
    - name: Install packages
      apt:
        name: nginx
        state: present
      tags:
        - packages
        - nginx

    - name: Configure Nginx
      template:
        src: nginx.conf.j2
        dest: /etc/nginx/nginx.conf
      tags:
        - configuration
        - nginx

    - name: Deploy application
      copy:
        src: app/
        dest: /var/www/html/
      tags:
        - deployment
        - application

# Run only nginx tasks
# ansible-playbook play.yml --tags nginx

# Skip deployment
# ansible-playbook play.yml --skip-tags deployment
6. Error Handling and Debugging
---
- name: Robust Task Execution
  hosts: webservers

  tasks:
    - name: Attempt risky operation
      command: /usr/bin/risky_command
      register: result
      failed_when: false
      changed_when: result.rc == 0

    - name: Debug output
      debug:
        var: result
        verbosity: 2

    - name: Handle failure
      debug:
        msg: "Command failed but continuing..."
      when: result.rc != 0

    - name: Block with rescue
      block:
        - name: Try this first
          command: /may/fail

        - name: If successful, do this
          debug:
            msg: "Success!"

      rescue:
        - name: If failed, do this instead
          debug:
            msg: "Recovered from failure"

      always:
        - name: Always run this
          debug:
            msg: "Cleanup operations"
7. Performance Optimization
Enable Pipelining
# ansible.cfg
[defaults]
pipelining = True
Use Mitogen (3-7x Performance Boost)
# Install Mitogen
pip install mitogen
# ansible.cfg
[defaults]
strategy_plugins = /path/to/mitogen/ansible_mitogen/plugins/strategy
strategy = mitogen_linear
Parallel Execution
---
- name: Parallel Updates
  hosts: all
  strategy: free  # Don't wait for all hosts
  serial: 10      # Process 10 hosts at a time

  tasks:
    - name: Update packages
      apt:
        upgrade: dist
Troubleshooting Common Issues
Issue 1: SSH Connection Failures
Problem: Unable to connect to managed hosts
Solutions:
# Test raw SSH connection
ssh -vvv user@host

# Test Ansible connection
ansible host -m ping -vvv

# Add to inventory
[all:vars]
ansible_ssh_common_args='-o StrictHostKeyChecking=no'
Issue 2: Permission Denied (Sudo)
Problem: Tasks fail with permission errors
Solution:
---
- hosts: webservers
  become: yes
  become_method: sudo
  become_user: root

  tasks:
    - name: Task requiring root
      file:
        path: /etc/myconfig
        state: touch
Issue 3: Module Not Found
Problem: “Module not found” errors
Solution:
# Ensure collection is installed
ansible-galaxy collection install community.general

# Verify collection
ansible-galaxy collection list

# Use FQCN (Fully Qualified Collection Name)
community.general.docker_container:
  name: mycontainer
Issue 4: Slow Playbook Execution
Solutions:
- Enable pipelining (see Performance section)
- Use Mitogen strategy plugin
- Disable gathering facts if not needed:
- hosts: all gather_facts: no - Use async for long-running tasks:
- name: Long running task
  command: /usr/bin/long_task
  async: 3600
  poll: 0
Ansible Career Path and Certifications
Skills Progression
Beginner (0-6 months):
- Write basic playbooks
- Understand inventory and variables
- Use common modules
- Execute playbooks
Intermediate (6-18 months):
- Create reusable roles
- Implement error handling
- Use Ansible Vault
- Integrate with CI/CD
- Manage multiple environments
Advanced (18+ months):
- Design complex automation frameworks
- Create custom modules and plugins
- Architect Tower/AWX deployments
- Optimize performance
- Mentor others
Certifications
Red Hat Certified Specialist in Ansible Automation (EX407)
- Demonstrates Ansible proficiency
- Hands-on performance-based exam
- Valid for 3 years
- Industry recognized
Preparation Resources:
- Red Hat Learning Subscription
- Ansible documentation
- Practice labs (A Cloud Guru, Udemy)
- Community forums
Job Market (2026)
Average Salaries (US):
- Junior Ansible Engineer: $75,000-$95,000
- Mid-level DevOps Engineer (Ansible): $110,000-$140,000
- Senior Automation Architect: $150,000-$190,000
In-Demand Skills:
- Ansible + Kubernetes
- Ansible + Terraform (hybrid IaC)
- Ansible + CI/CD (Jenkins, GitLab)
- Ansible + Cloud (AWS, Azure, GCP)
- Ansible Tower/AWX administration
Learning Resources and Community
Official Documentation
- Ansible Documentation
- Ansible Galaxy - Role sharing platform
- Ansible GitHub
Online Courses
- Red Hat Learning Subscription
- Udemy: “Ansible for the Absolute Beginner”
- A Cloud Guru: “Hands-on Ansible”
- Linux Academy: “Ansible Quick Start”
Books
- “Ansible for DevOps” by Jeff Geerling (Updated 2025)
- “Ansible: Up and Running” by Lorin Hochstein
- “Mastering Ansible” by James Freeman
Community
- Ansible Mailing List
- Ansible Reddit
- Ansible Discord Server
- Ansible meetups (local and virtual)
Practice Platforms
- Katacoda Ansible Scenarios
- Ansible Playground
- Local lab with Vagrant or Docker
Conclusion: Your Ansible Journey Starts Here
Ansible has evolved into the automation tool of choice for organizations worldwide, and 2026 brings even more capabilities, easier Windows management, enhanced cloud integrations, and AI-assisted playbook generation. The skills you build with Ansible will serve you throughout your IT career, whether you’re managing traditional infrastructure, cloud environments, or hybrid deployments.
main points:
- Start Simple: Begin with basic playbooks managing a few servers
- Practice Regularly: Set up a home lab and experiment
- Learn by Doing: Automate real tasks from your daily work
- Use Best Practices: Version control, testing, and documentation
- Join the Community: Learn from others and share your knowledge
- Stay Current: Ansible evolves rapidly - keep learning
- Combine Tools: Ansible + Terraform + Kubernetes = powerful automation
Next Steps:
- Install Ansible on your system
- Create a simple inventory of test servers (VMs or containers)
- Write your first playbook (package installation)
- Gradually add complexity (templates, variables, roles)
- Contribute to community roles on Ansible Galaxy
- Consider certification to validate your skills
The journey from Ansible beginner to expert is rewarding and opens doors to DevOps, SRE, and cloud engineering roles. With the fundamentals covered in this guide, you’re well-equipped to start automating infrastructure and building a valuable skillset for the modern IT landscape.
Welcome to the world of infrastructure automation with Ansible!
References
- Official Ansible Documentation
- Ansible Galaxy - Role Repository
- Ansible GitHub Repository
- Red Hat Ansible Automation Platform
- AWX - Open Source Ansible Tower
- Ansible Best Practices
- Molecule Testing Framework
- Ansible Lint
- Jeff Geerling’s Ansible for DevOps
- Ansible Collections Index
Related Posts