

WingBits Install and Setup Guide

Table of Contents
Note: This article does not contain or entail an endorsement of wingbits nor does it contain any financial advice. Please do your own research. This article is for educational purposes only.
Introduction
Cryptocurrency mining continues to evolve, and the WingBits technology stack offers an accessible pathway for enthusiasts. In this guide, we’ll explore the hardware requirements, ADSB-specific equipment, and step-by-step instructions for setting up your WingBits mining rig. Whether you’re diving into mining for the first time or optimizing your current setup, this comprehensive guide will walk you through the process, from selecting the right hardware to fine-tuning gain levels. Let’s embark on a journey to efficient and budget-friendly cryptocurrency mining with WingBits.
The WingBits SkyHex: Revolutionizing ADS-B Data Coverage
WingBits Core Values
WingBits positions itself as a provider of flight tracking data feeds, catering to both live and historic flights. This valuable resource becomes instrumental for developers seeking real-time aircraft data integration into their applications. The clientele spans across various sectors, encompassing aviation companies, emergency services, and even aviation enthusiasts.
WingBitsCoverage - SkyHex
WingBits sets an ambitious target: global coverage. The innovative SkyHex system, inspired by air rights and leveraging Uber’s h3 hex system, divides the global airspace into hexagons. This unique approach grants antennas exclusive rights to monitor specific sections of the sky, ensuring meticulous observation for enhanced air traffic management and safety.
WingBits Details
SkyHex NFT Ownership: Antennas require a SkyHex NFT for full rewards, aligning with an ownership model reminiscent of air rights, while still rewarding, minimally, those without an NFT to promote redundant coverage.
Maximizing Coverage: Multiple antennas within the same hex maximize coverage, with most of the rewards ideally based on unique data contributions.
Limited Supply: With a maximum supply of [current maximum supply], exclusivity and scarcity are maintained.
Reclaiming Inactivity: Inactive antennas for 30 days face NFT reclamation, exceptions granted for technical issues.
Transferability: SkyHex NFTs can be sold or transferred after 30 days of use, introducing dynamism to the digital asset marketplace.
Penalties for Delays: Slow antennas facing delays over 1 minute incur a 25% reward reduction for each minute compared to other hex owners.
Explore more about SkyHex here .
WingBits Rewards: An Overview of Participation Options
Before deciding on Core Network participation, please review the details provided below.
Supporter Network (default):
Open and Inclusive Participation: The Supporter Network welcomes all participants without any associated charges. Every project member is automatically considered a Supporter.
Reward Structure: Supporters receive rewards based on the percentage of messages they contribute for each hex, fostering an inclusive environment where all participants are eligible for rewards based on their data contributions.
Core Network (optional - $20/hex):
Enhanced Rewards for Hex Owners: Core participants, who are hex owners, receive additional rewards on top of the regular rewards. This additional pool compensates for their investment in hex ownership, maintenance, and adherence to contribution standards.
Reward Calculation: Core members are rewarded based on their message contribution percentage and system uptime for a hex. They also participate in Supporter network rewards, allowing them to benefit from both Core and Supporter reward pools for each hex they contribute data against.
Participation Cap: The Core network maintains a maximum limit of three owners per hex, aligning with current Skyhex ownership rules.
Optimized Setups/Coverage: Core participants are expected to play a crucial role in forming a robust project network. Their optimized setups and coverage contribute to the overall efficiency of the network, driven by the incentive of higher rewards and additional perks.
Examples of Reward Distribution:
Note: Examples use a placeholder base rewards of 50 tokens. Exact base rewards have not been defined at this time. Examples assume all contributors provide equal data volume and equal uptime (for easier examples).
| Example | Description | Core Participant Wings | Supporter Wings |
|---|---|---|---|
| 1 | One Supporter covering a hex | N/A | 50 Wings |
| 2 | One Supporter and One Core participant covering a hex | 75 Wings (50 Core rewards + 25 Normal rewards) | 25 Wings |
| 3 | Two Supporters and Two Core participants covering a hex | 62.5 Wings each (50 Core rewards + 12.5 Normal rewards) | 12.5 Wings each |
| 4 | One Core participant covering a hex | 100 Wings (50 Core rewards + 50 Normal rewards) | N/A |
For more details on the formulas used in the examples, please refer to the Supporter & Core Network Participation documentation .
Additional Notes:
- Core network membership offers additional perks beyond what is available to Supporter Network members.
- Core network participants are expected to meet minimum standards in terms of uptime and data contribution for each hex they own.
- Supporter and Core network participation aims to build a more robust and efficient network by encouraging high-quality data coverage and appropriately rewarding both casual contributors and dedicated hex owners.
Addressing WingBits Concerns: Ensuring Significance and Fairness
WingBits proactively acknowledges and addresses concerns related to the fairness of ADS-B data monetization .
WingBits’ Significance
WingBits’ significance lies in offering a decentralized model that fairly rewards contributors. This ensures the authenticity and timeliness of ADS-B data, contributing to the efficiency and safety of the aviation industry.
WingBits’ Fairness and Sufficiency
WingBits implements fairness through penalties for slow antennas, promoting active and responsive participation. The sufficiency of the model is evident in the transparent and equitable distribution of Wings, fostering a collaborative ecosystem.
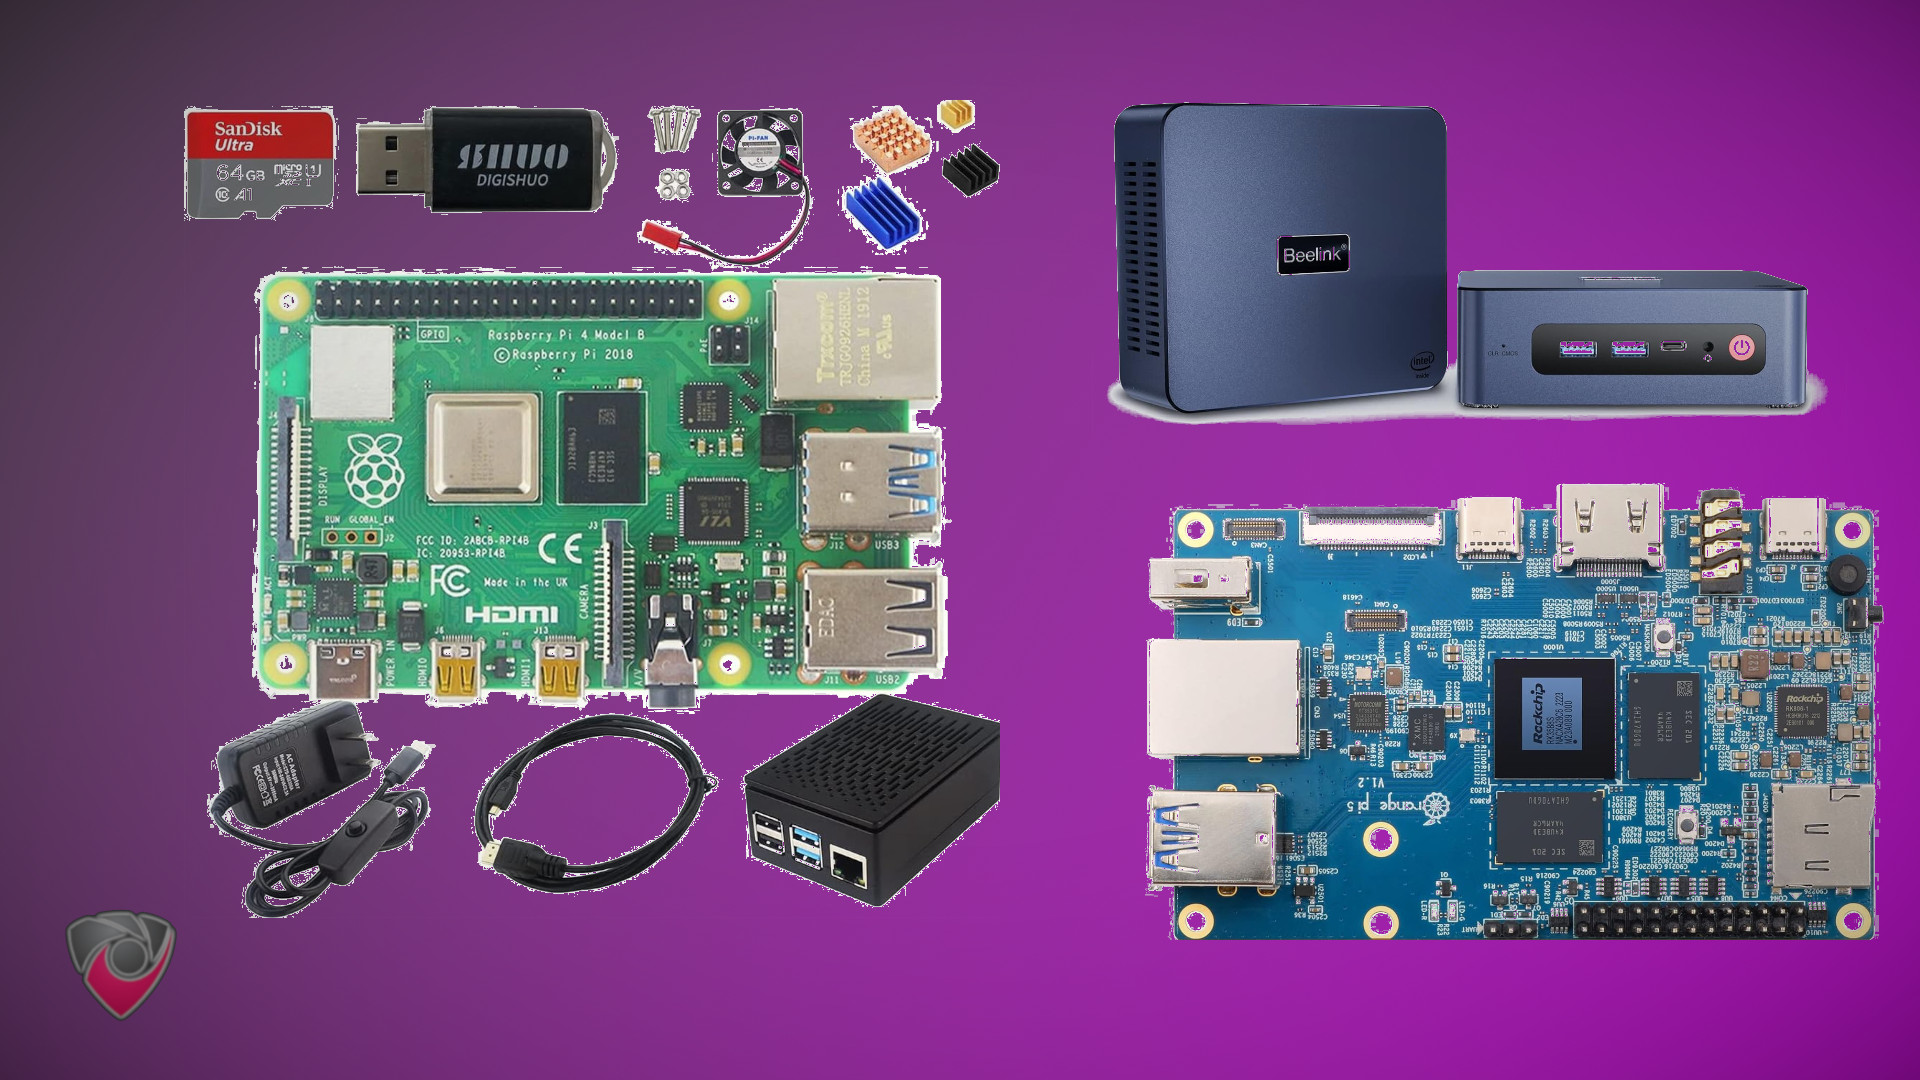
WingBits Hardware Requirements:
Our Recommended WingBits Hardware Configuration
Our Ideal Setup for WingBits Flight Tracking
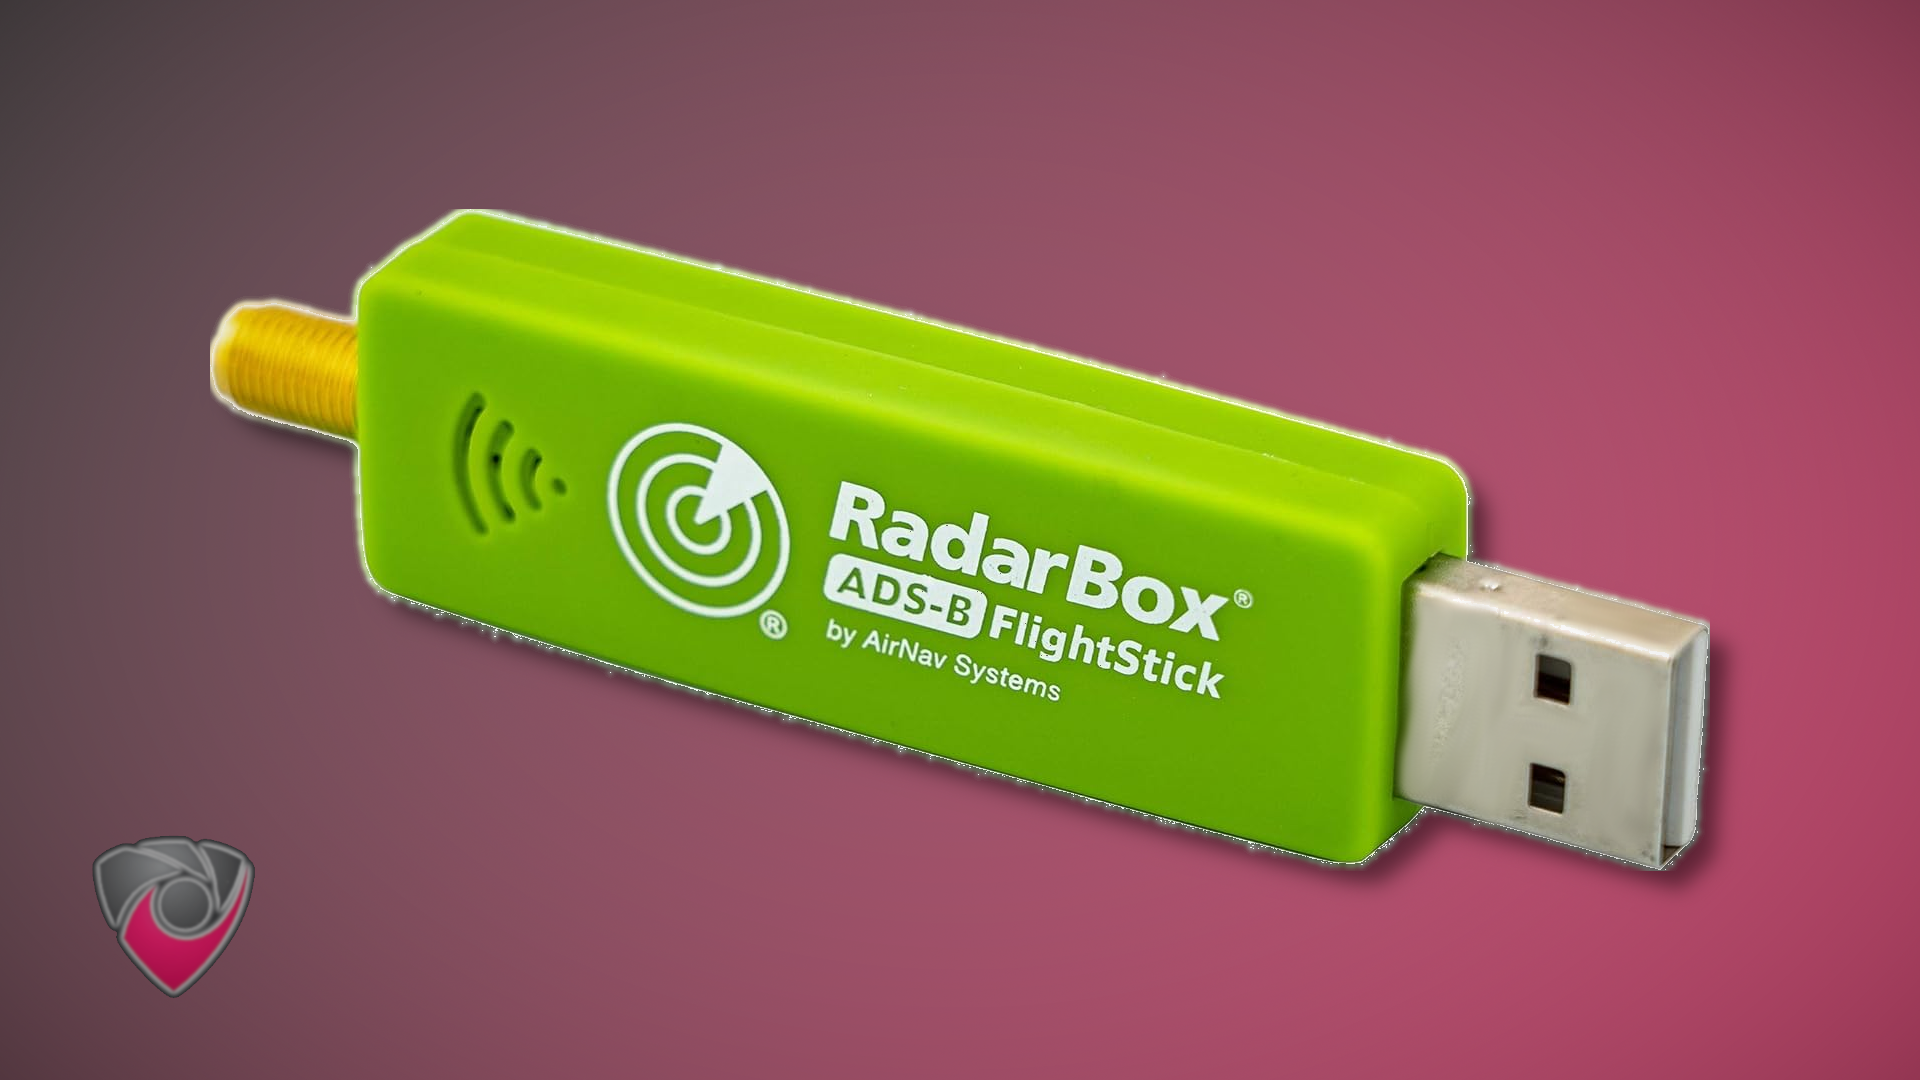
For aviation enthusiasts or those keen on monitoring aircraft movements, we recommend an ideal setup that combines the versatility of the Raspberry Pi 4B Model B DIY Kit with specialized components for ADS-B reception. The Raspberry Pi DIY Kit is perfect for enthusiasts seeking a customizable computing solution. Paired with the AirNav Radarbox Flightstick and SIGNALPLUS 1090MHz ADS-B Antenna, this setup ensures optimal performance, features, and reliability for accurate and detailed flight tracking.
Note: Don’t go for an antenna higher than 6 db unless you know specifically you need it. For wingbits you should optimize for reliable coverage, not distance.
WingBits System Requirements and Recommendations:
One of the following is required. We basically just need any efficient and low powered computer we can get our hands on. Any Raspberry PI, Intel NUC, or similar will do. They don’t have to be all that powerful. However I will recommend you have at least 32g-64g of storage, 4g of ram, and at least 2 cpu threads. For this we will be targeting a budget of around $100-$200 for hardware but feel free to go higher if it suits your needs. Our power target is 25w or better on average.
ADSB Specific Equipment:
ADSB Receivers for WingBits
We go into this in much greater detail in our Guide on Best ADSB RTL-SDR Recievers
ADSB Antennas for WingBits
Optional Extras for WingBits
The ADSB receivers linked above have LNA and Filters built in. Only consider using a LNA or Filters if you have a non specific SDR
Nooelec SAWbird+ ADS-B
| Model | Description |
|---|---|
| A premium, dual-channel, cascaded ultra-low noise amplifier (LNA) and filter module designed for airplane tracking applications. |
Band Pass and SAW Filters for WingBits
Low Noise Amplifiers for WingBits
SMA Pigtails for WingBits
OS Installation:
We won’t go into the technical details of how to install an operating system here. However here are some great resources to get you started.
Raspbian:
Ubuntu:
- Install Ubuntu desktop
- Ubuntu Server - Basic installation
- Ubuntu Complete Beginner’s Guide: Download & Installing Ubuntu
Setup Instructions for Installing WingBits
Wingbits Home Page
Wingbits technology stack currently operates like this.
readsb -> vector -> wingbits
To get started is simple, just follow these steps:
1. Run the WingBits setup script by using the command:
curl -sL https://gitlab.com/wingbits/config/-/raw/master/download.sh | sudo bash
Note: Make sure you have your
device ID/antenna name, which you can find in your original WingBits email or on the WingBits dashboard .
2: Setting Up Your Location
Setting your mining location is crucial. Use tools like LatLong.net to find the coordinates for your installation site. Replace the example coordinates with your own:
sudo readsb-set-location 50.12344 10.23429
3: Optimizing Gain Levels
Note: Read the Troubleshooting and Helpful Commands section below on how to set the gain levels more optimally. Note: The WingBits community has specifically recommended to not use the autogain script, mentioning issues with some receivers and issues with the script setting the gain too low. Read below for instructions on how to set the readsb gain manually .
Now, it’s time to optimize your receiver’s gain levels. Run the following command, if it fails, come back to this step after a few minutes.
# sudo bash -c "$(curl -L -o - https://github.com/wiedehopf/adsb-scripts/raw/master/autogain-install.sh)" hash -r
# sudo autogain1090
# Run ever 2 minutes, in the background, for an hour to optimize gain even further
# sudo for i in {0..30}; do sudo autogain1090; sleep 120; done &
4. Profit?
At this point you’re done. Sit back and relax. However if you discover you are running into issues, or you’d like to learn more, read below.
Troubleshooting and Helpful Commands for WingBits
Tuning ADS-B Gain for Optimal Performance for WingBits
Understanding how to adjust the gain on your ADS-B receiver is crucial for optimizing performance and ensuring accurate data reception. Here’s a step-by-step guide on tuning the gain for your system.
Overview of Gain and its Analogy
Gain, analogous to volume in audio terms, plays a pivotal role in receiving ADS-B signals. Similar to turning up the volume, increasing gain amplifies signals, but at a certain point, it can lead to distortion and signal loss.
Avoiding Autotune and Checking Current Gain
Autotune is not recommended for quick and precise gain adjustments. To view your current gain, check the “Misc” section in the graphs1090 interface. The gain value is displayed here.
Changing Gain Manually
Adjusting gain is straightforward and can be done using the Terminal. Enter the following command, replacing “xx.x” with your desired gain:
sudo readsb-gain xx.x
Available gain settings are limited to specific values. If you input a different value, it will snap to the nearest valid gain from the following list:
0.0 0.9 1.4 2.7 3.7 7.7 8.7 12.5 14.4 15.7 16.6 19.7 20.7 22.9 25.4
28.0 29.7 32.8 33.8 36.4 37.2 38.6 40.2 42.1 43.4 43.9 44.5 48.0 49.6 -10
Real-Time Gain Read and Verification
For a real-time gain read over a specific time period since readsb started, use the following command:
grep -sh /run/{dump1090,dump1090-fa,readsb}/stats.json -e '' | jq '.total.local | ((.accepted | add), .strong_signals, .signal, .noise)' | xargs -n4 echo | awk '{printf "\nPercentage of strong messages: %.3f\nSignal: %.1f\nNoise: %.1f\n", $(2) * 100 / $(1), $(3), $(4)}'
This command provides crucial information such as the percentage of strong messages, signal strength, and noise level.
In the command you can change .total.local to any of the options below to get more recent data, if needed.
last1minlast5minlast15min
Verifying Gain Impact on Range
To ensure your adjusted gain doesn’t compromise range, utilize the ADS-B Range graph on the x.x.x.x/graphs1090 page. Confirm that you’re still receiving an adequate range even as you modify the gain.
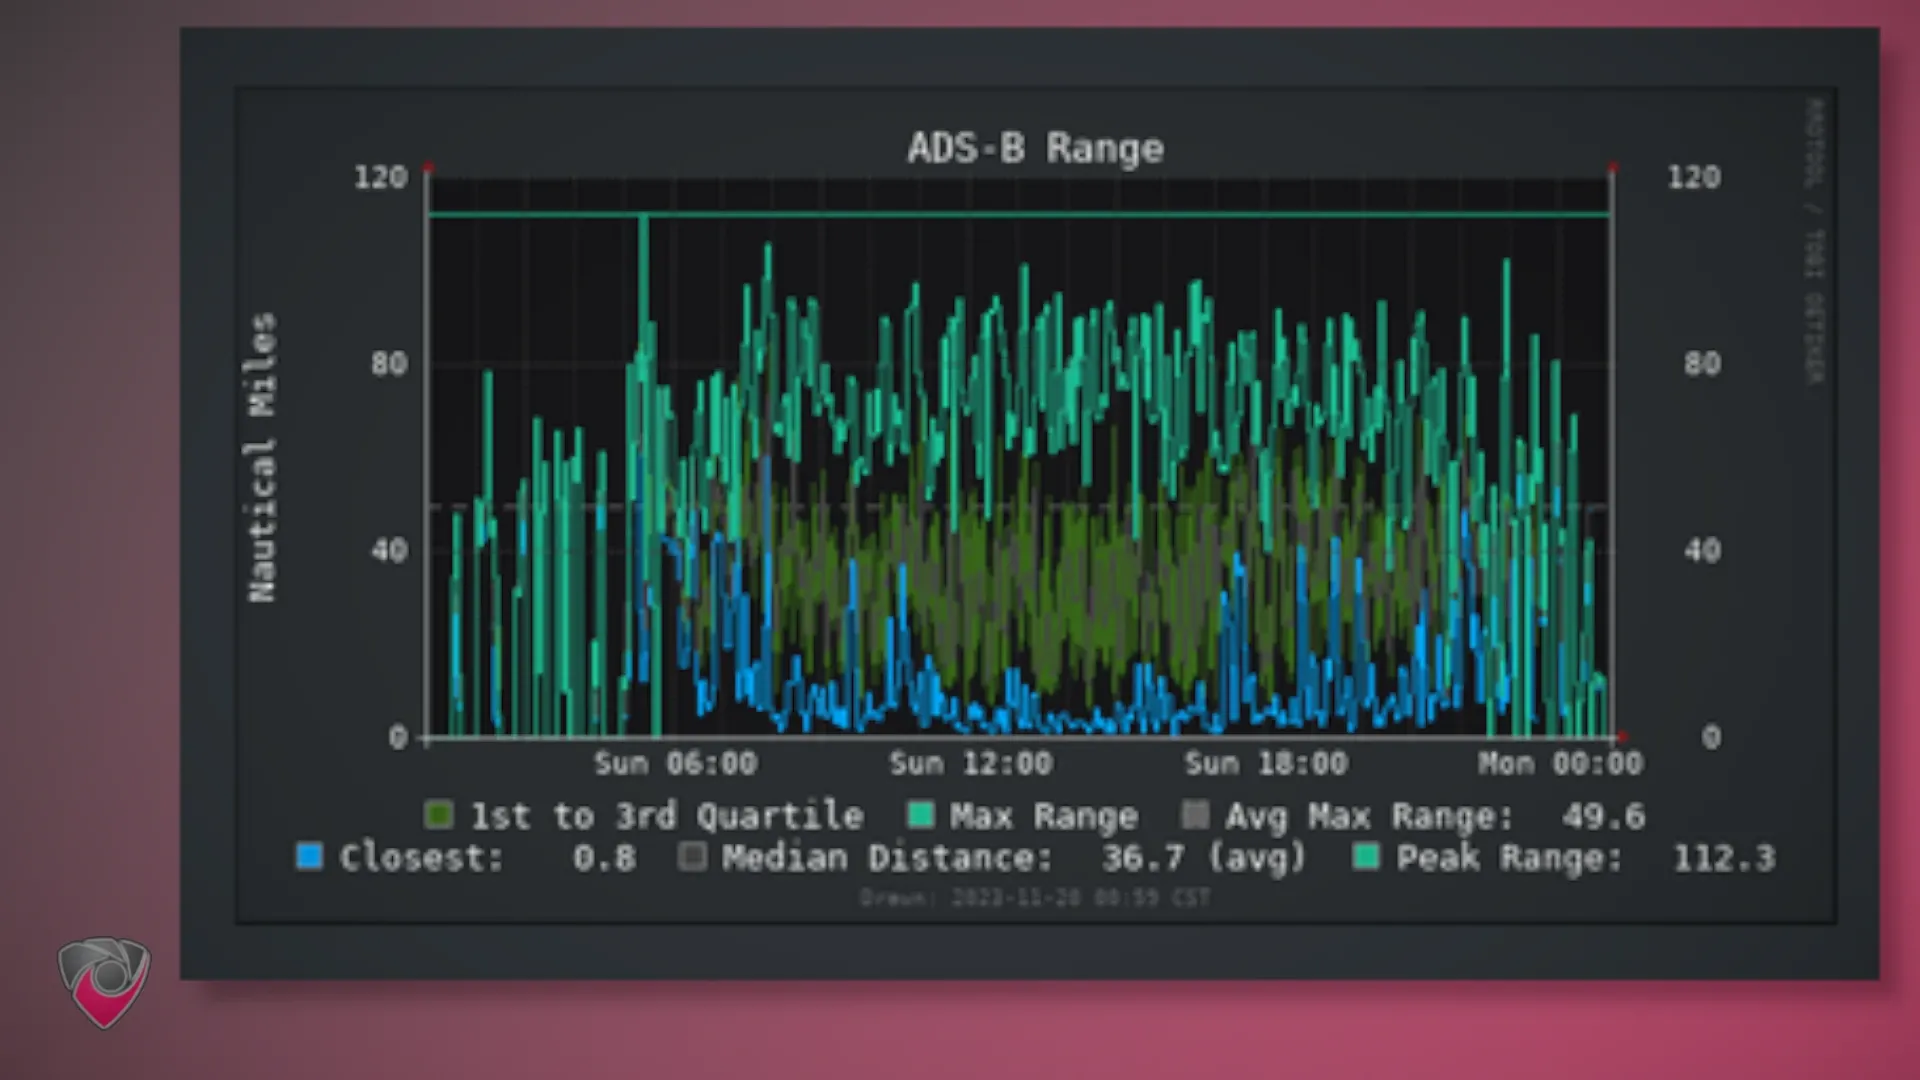
The number you should care about is Avg Max Range
ADS-B Analysis with Dirk Beer
For more detailed analysis, Dirk Beer’s Python script can assess your range by assuming that aircraft will transmit again. Running Dirk’s scripts helps evaluate the impact of gain adjustments on reception range.
The script provides easy to understand graphs to help you determine your maximum reliable range.
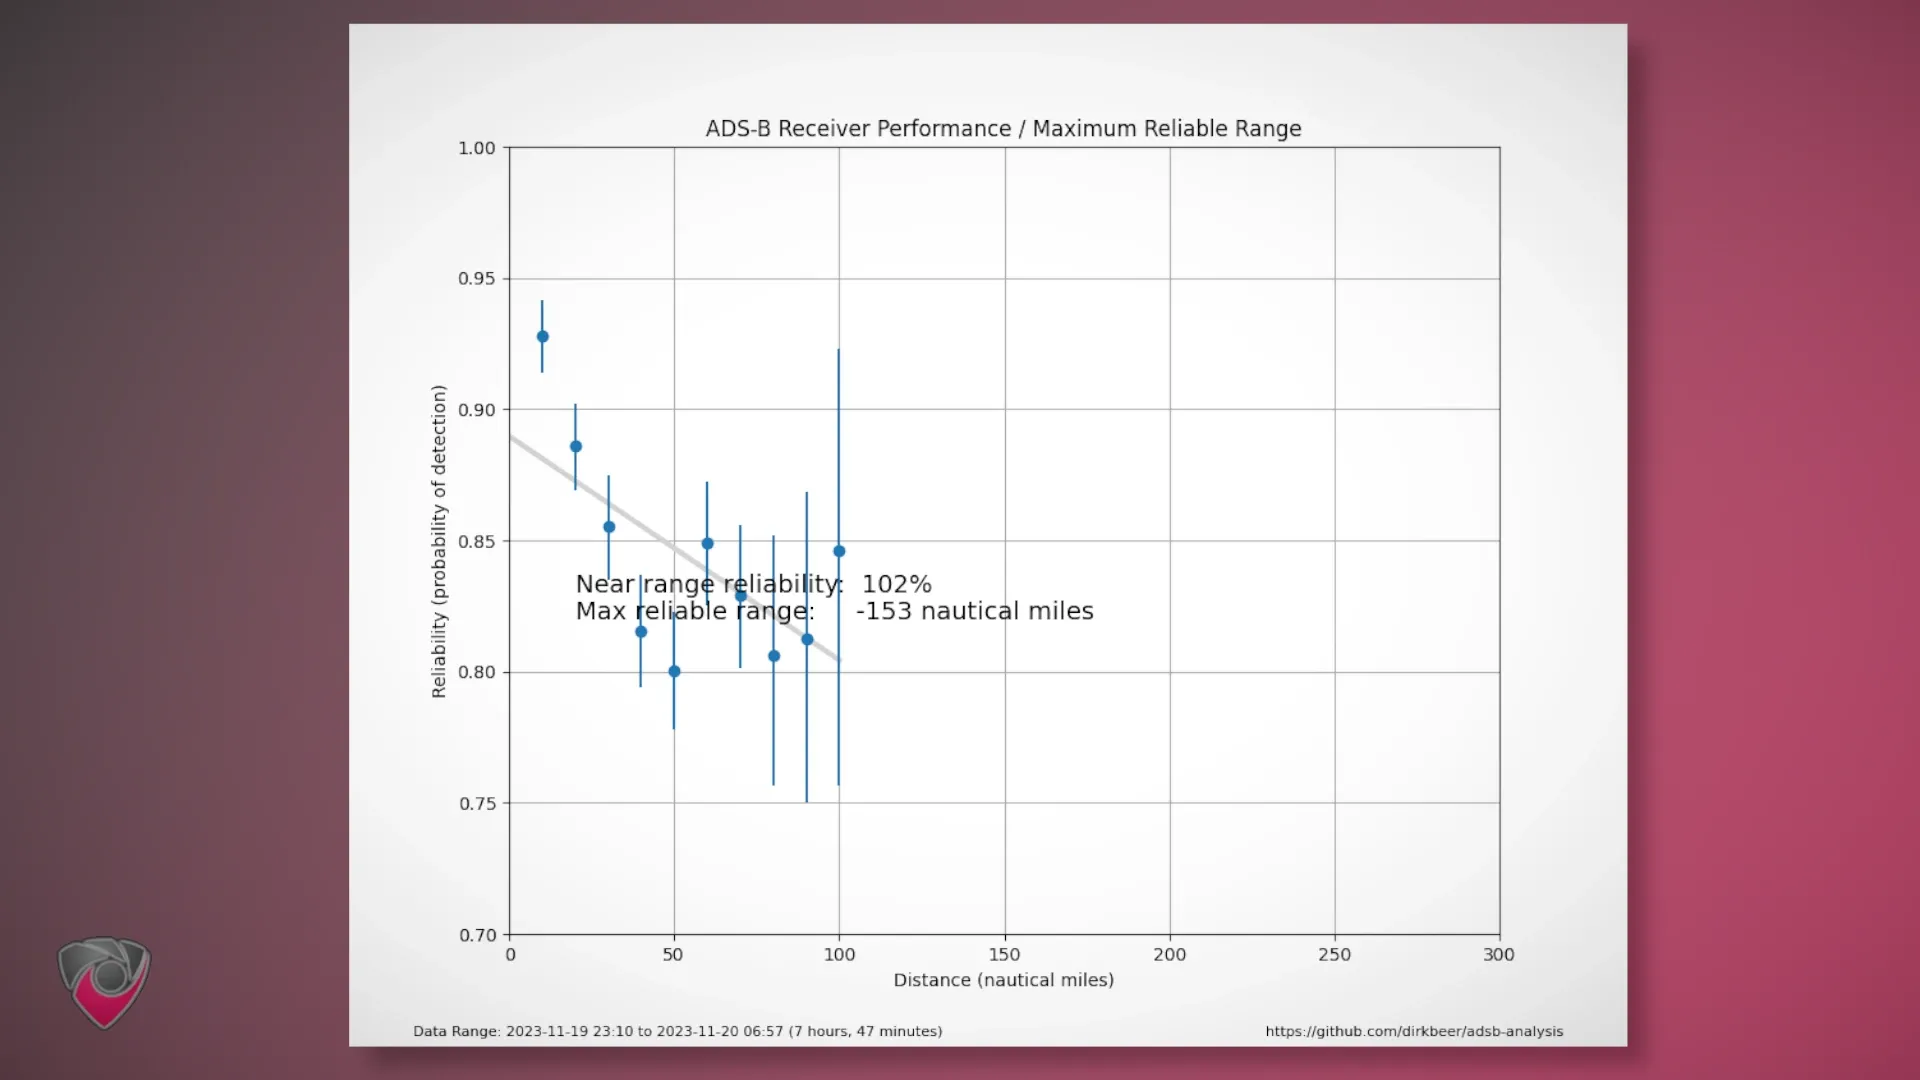
Average ADS-B Receiver Performance Graph for Indoor Setups.
It is based on the theory that probability of detection P(D) of an aircraft’s message in the current 8-second measurement interval, given that that the aircraft’s message was received in the previous interval.
Note: Specific goals for ADS-B reception may vary, and striking a balance between maximum range, minimal “too hot” messages, and maximum aircraft reception is recommended.
Setup Script
curl -sSL https://raw.githubusercontent.com/dirkbeer/adsb-analysis/main/setup.sh | sudo bash
Analysis Script
sudo ~/adsb-analysis/run_analysis.sh
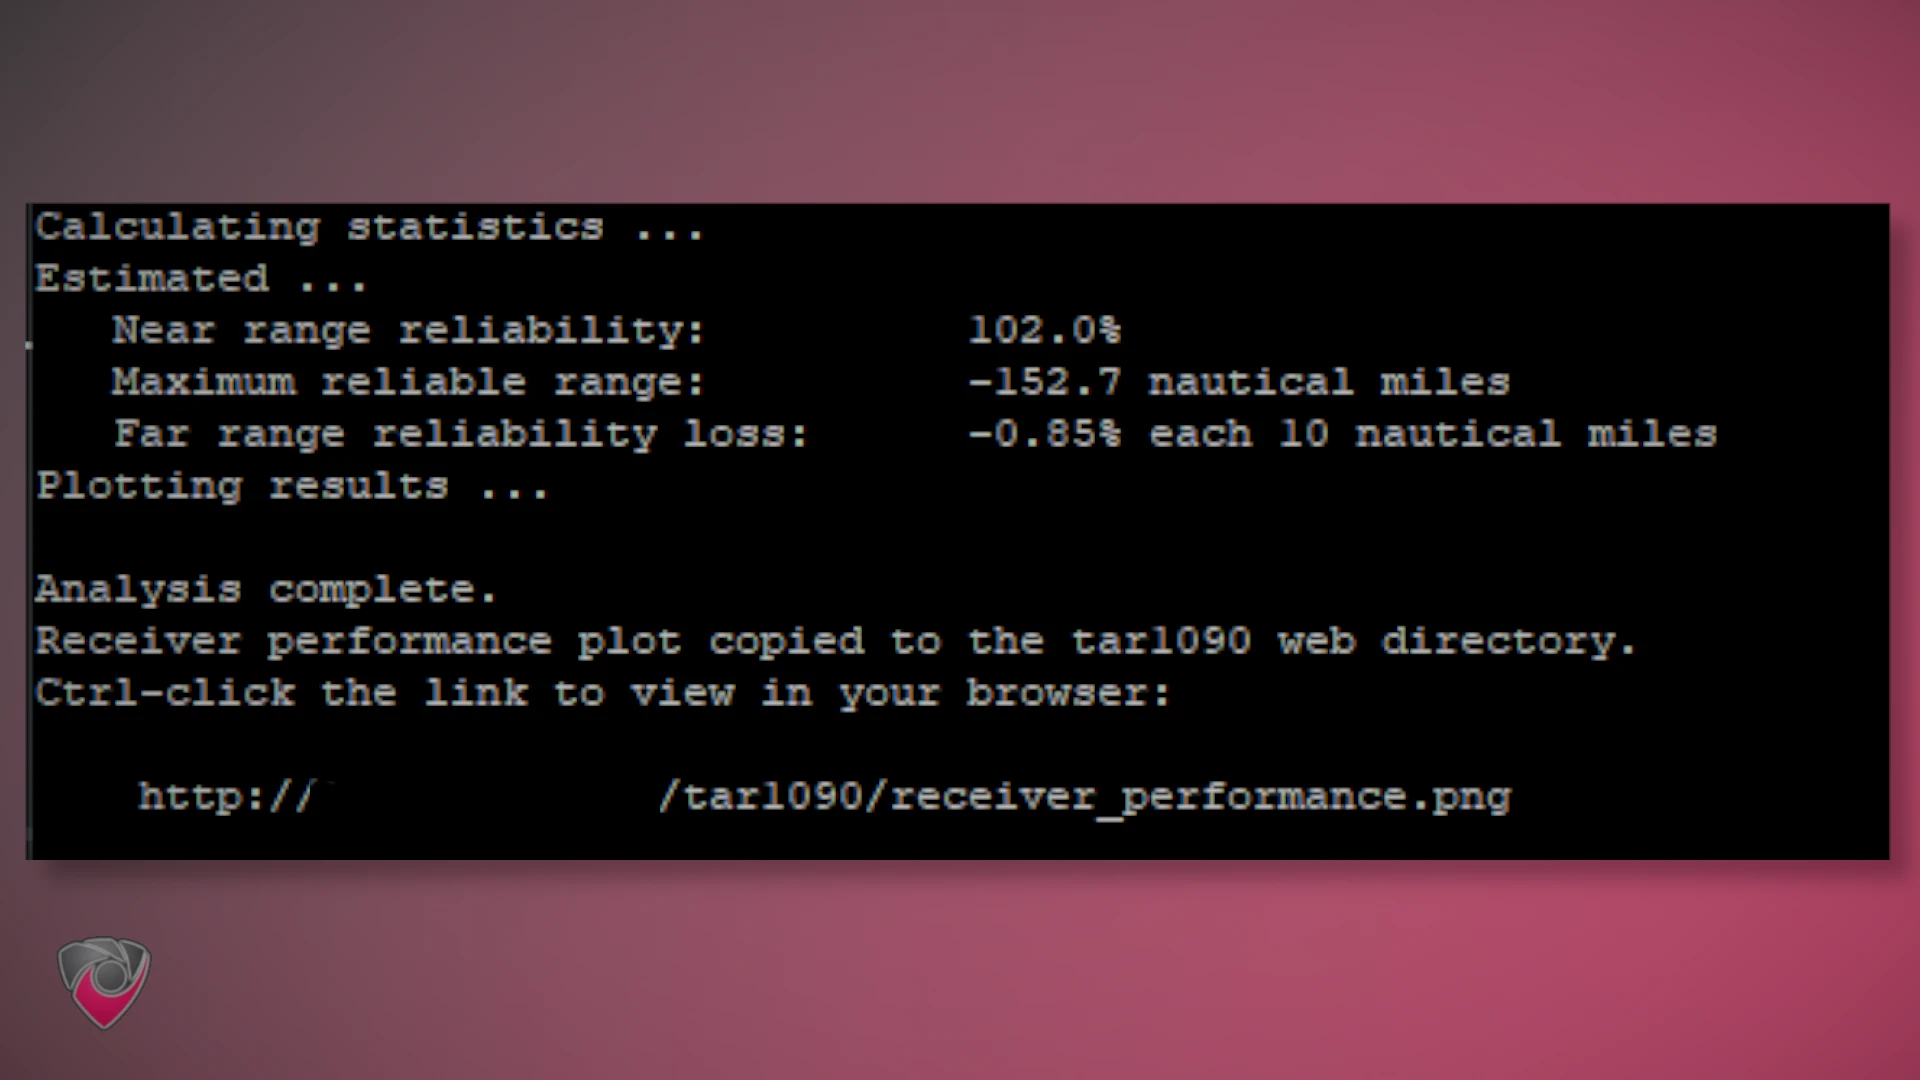
Example Script Output
Further Exploration with Dirk Beer’s Scripts
For an in-depth ADS-B analysis, Dirk Beer’s scripts, available on his GitHub , provide additional insights into your system’s range and reception capabilities. Running these scripts can complement the information obtained from other Python scripts.
Optimizing ADS-B gain involves continuous adjustment and monitoring, allowing you to tailor your setup for optimal performance based on your specific preferences and goals. Experimenting with gain levels and analyzing the impact on reception metrics is key to achieving the best results.
Configuring Location in readsb for ADS-B Reception and for WingBits
Introduction:
Properly configuring the location is essential for accurate ADS-B data reception. This guide outlines the steps to configure the location in readsb on a Raspberry Pi. Additionally, it provides troubleshooting tips and information on changing the configuration.
Configure Location for WingBits:
To set the location, use the following command with the specified latitude and longitude:
sudo readsb-set-location 50.12344 10.23429
Alternatively, use the full path to readsb-set-location:
sudo /usr/local/bin/readsb-set-location 50.12344 10.23429
Troubleshooting and Checking Logs for WingBits:
If any issues arise, check the readsb logs using the following command:
sudo journalctl --no-pager -u readsb
If problems persist, try rebooting and rerunning the install script.
Reporting Issues with readsb:
- If issues persist, consider opening a GitHub issue with the provided logs and install script output.
- Alternatively, report issues with
readsbvia Discord by contacting wiedehopf here .
Changing Configuration:
To modify readsb configuration, use a text editor such as nano:
sudo nano /etc/default/readsb
Make the necessary changes, save with Ctrl-O and Enter, then exit with Ctrl-X. Afterward, restart the readsb service:
sudo systemctl restart readsb
For a comprehensive list of available options, refer to the readsb help command:
readsb --help
Conclusion:
Configuring the location is a critical step in optimizing ADS-B reception with readsb. Following these steps ensures accurate data and provides troubleshooting avenues for any potential issues.
Debug Commands for ADS-B Setup and for WingBits
Introduction:
Debugging is an essential aspect of maintaining an ADS-B setup on a Raspberry Pi. This guide provides various debug commands for different components, ensuring the smooth operation of readsb, dump1090-fa, and related services.
Lighttpd Debug Commands:
View lighttpd logs:
sudo journalctl --no-pager -u lighttpdList enabled lighttpd configurations:
ls /etc/lighttpd/conf-enabled
readsb Debug Command:
- View dump1090-fa logs:
sudo journalctl --no-pager -u readsb
dump1090-fa Debug Command:
- View dump1090-fa logs:
sudo journalctl --no-pager -u dump1090-fa
Test the RTL-SDR Receiver:
To test the RTL-SDR receiver, run the following command:
sudo bash -c "$(wget -q -O - https://raw.githubusercontent.com/wiedehopf/adsb-scripts/master/rtl_test.sh)"
Conclusion:
Optimizing gain settings is crucial for achieving optimal ADS-B reception on a Raspberry Pi using readsb. Whether using the automatic or manual method, users can fine-tune their settings based on their specific environment and preferences, ensuring reliable and efficient aircraft tracking.
Activating RTL Bias Tee with readsb and dump1090-fa
Introduction:
Activating the RTL Bias Tee is a crucial step in enhancing the performance of your ADS-B setup when using readsb or dump1090-fa on a Raspberry Pi. This guide provides instructions on enabling and disabling the Bias Tee while the readsb/dump1090-fa service is running.
Enabling Bias Tee:
To enable the Bias Tee while the readsb or dump1090-fa service is running, use the following script:
curl https://raw.githubusercontent.com/wiedehopf/adsb-scripts/master/biastee-enable.sh | sudo bash
This script facilitates the activation of the Bias Tee, ensuring that your RTL-SDR device receives power through the coaxial cable.
Disabling Bias Tee:
In cases where automatic Bias Tee enabling is not desired, use the following script to disable it:
curl https://raw.githubusercontent.com/wiedehopf/adsb-scripts/master/biastee-disable.sh | sudo bash
Disabling the automatic Bias Tee enables users to have more control over the powering of their RTL-SDR device.
Note: These scripts roughly follow the method outlined here .
Displaying RSSI Signal Strength Column in dump1090-fa Web Interface
Introduction:
By default, the RSSI (Received Signal Strength Indicator) column in the dump1090-fa web interface table is hidden when the map is displayed. This guide provides instructions on how to modify the configuration to always display the RSSI column, enhancing visibility and providing valuable signal strength information.
Modification Commands:
To always show the RSSI column in the dump1090-fa web interface, execute the following command:
sudo sed -iE -e 's/showColumn(infoTable, "#rssi"/\/\/showColumn(infoTable, "#rssi"/g' /usr/share/dump1090-fa/html/script.js
To revert the change and hide the RSSI column only when the map is displayed, use the following command:
sudo sed -iE -e 's/\/*showColumn(infoTable, "#rssi"/showColumn(infoTable, "#rssi"/g' /usr/share/dump1090-fa/html/script.js
If you prefer using an editor to make these changes:
Locate the following line (Line 1573 in version 3.6.3):
showColumn(infoTable, "#rssi", !mapIsVisible);Add
//at the beginning of the line to always show the RSSI column://showColumn(infoTable, "#rssi", !mapIsVisible);
Conclusion:
Enhancing the dump1090-fa web interface by always displaying the RSSI column provides valuable insight into signal strength. These modification commands offer a straightforward way to customize the interface based on user preferences.
Automatic Reboot on Internet Connection Failure with pingfail
Introduction:
Ensuring a stable internet connection is crucial for the continuous operation of ADS-B setups. This guide introduces pingfail, a tool that automatically reboots the computer when the internet connection is lost for an extended period. This helps maintain a reliable connection and prevents interruptions in data reception.
Installation:
To install pingfail and set up automatic reboots on internet connection failure, use the following command:
sudo bash -c "$(wget -q -O - raw.githubusercontent.com/wiedehopf/adsb-scripts/master/pingfail-install.sh)"
Note: This installation is configured to reboot the computer if the internet is unreachable for at least 5 minutes.
Deactivation:
To deactivate pingfail and stop automatic reboots, use the following command:
sudo systemctl disable --now pingfail
Note: Deactivating pingfail is recommended if you encounter issues or want to temporarily suspend automatic reboots.
Conclusion:
pingfail provides a simple yet effective solution for maintaining a stable internet connection for ADS-B setups. By automatically rebooting the computer in the event of extended internet unavailability, users can ensure continuous data reception and minimize downtime.
About Flight Tracking
For those interested, Flight Tracking involves the use of small computers, typically a Raspberry Pi, connected to a software-defined radio (SDR) USB stick operating at 1090 MHz. This setup, known as a feeder or ADS-B receiver, captures aircraft positions transmitted on 1090 MHz, primarily through Automatic Dependent Surveillance–Broadcast (ADS-B). The essential components for building such a device are detailed below.
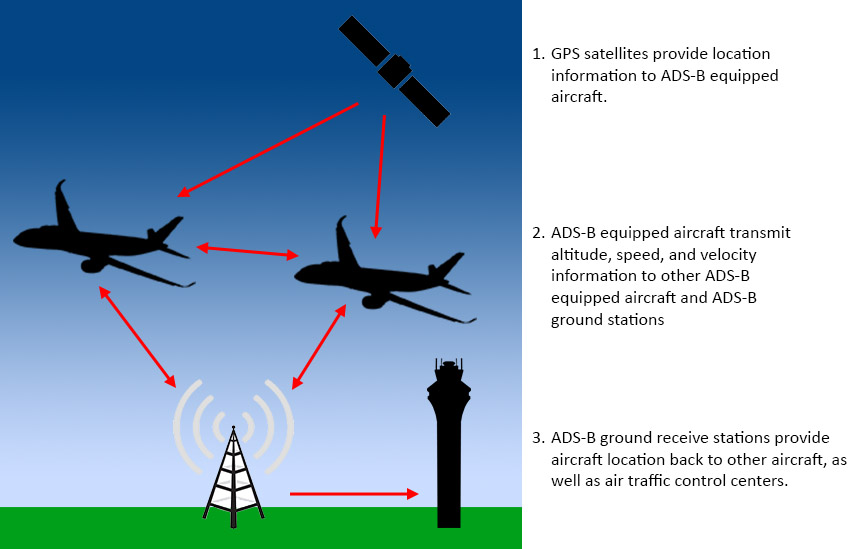
Simplified ADS-B Network Example - southwestantennas.com
Unique Identifiers and Aircraft History
Each aircraft transmitting its position on 1090 MHz is assigned a unique hexadecimal identifier, such as ABA7D9. This identifier remains constant, allowing users to track the historical data for a specific airframe. For example, the US-registered aircraft N850FD corresponds to the hex ID ABA7D9. The aircraft history for N850FD includes details such as its current callsign (e.g., FDX5235), which may be associated with a city pair for certain airlines.
Detailed Aircraft Information
By selecting an aircraft on the ADS-B Exchange map , users can access detailed information on the left side of the page. Tooltips are available to explain various displayed elements. Additionally, users can explore the aircraft’s history by clicking on the history tab, revealing a colored line indicating its flight path. Timestamps, speed in knots, altitude in feet, and other details are displayed, providing a comprehensive overview of the aircraft’s journey.
Data Contribution and Real-Time Display
All the data presented on the ADS-B Exchange website is sourced from volunteers who have set up receivers, contributing real-time data. This data is collected and displayed on the online map, offering a collaborative and dynamic representation of aircraft movements globally.
ADS-B Aircraft Categories

Soar to New Heights with Varied Aircraft Types!
Flight tracking systems categorize ADS-B (Automatic Dependent Surveillance–Broadcast) equipped aircraft based on specific characteristics. These categories provide insights into the type and size of the aircraft, aiding in the identification and classification of air traffic. Here are the defined ADS-B aircraft categories :
- A-: Unspecified powered aircraft
- A1: Light (< 15,500 lbs.)
- A2: Small (15,500 to 75,000 lbs.)
- A3: Large (75,000 to 300,000 lbs.)
- A4: High Vortex Large (e.g., B-757)
- A5: Heavy (> 300,000 lbs.)
- A6: High Performance (> 5g acceleration and > 400kts)
- A7: Rotorcraft
- B-: Unspecified unpowered aircraft, UAV, or spacecraft
- B1: Glider/sailplane
- B2: Lighter-than-Air
- B3: Parachutist/Skydiver
- B4: Ultralight/hang-glider/paraglider
- B5: Reserved
- B6: Unmanned Aerial Vehicle (UAV)
- B7: Space/Trans-atmospheric vehicle
- C-: Unspecified ground installation or vehicle
- C1: Surface Vehicle - Emergency Vehicle
- C2: Surface Vehicle - Service Vehicle
- C3: Fixed Ground or Tethered Obstruction
WingBits Install and Setup Guide Conclusion
Congratulations on completing the setup of your WingBits mining system! By now, you’ve configured your hardware, fine-tuned your ADSB receiver, and optimized gain levels for maximum efficiency. Remember, cryptocurrency mining requires careful consideration of hardware, location, and market volatility. Always stay informed and adapt your strategy as needed. With your WingBits mining rig up and running, you’re well-positioned to explore the exciting world of digital currency. Happy mining!
If you’ve made it this far, you might like to know you can actually dual mine Wingbits and Defli , read our Guide on How to Dual Mine Wingbits and Defli .
References
Here are some helpful links for reference:
- WingBits
- WingBits Litepaper
- WingBits Map
- WingBits Discord
- WingBits Twitter
- WingBits Documentation
- DeFli
- readsB GitHub
- graphs1090 Documentation
- jq Command-Line JSON Processor
- ADS-B Reception on Raspberry Pi
- RTL-SDR Bias Tee Activation
- RTL-SDR Receiver Test
- dirkbeer/adsb-analysi
- Graphs1090 ADSB Optimization Guide
- ADS-B Identification
- WingBits Docs
Disclosure and Affiliate Statement:
Affiliate Disclosure: We may earn a commission from links on this page. These commissions support our website and the content we provide. Rest assured, we only recommend products/services we believe in. Thank you for your trust! Click Here to Learn More
Related Posts


This article refers to other articles we've written:
- Effortless Dual Mining Guide: WingBits and DeFli Setup
Learn how to set up dual mining with WingBits and DeFli in this comprehensive guide. Maximize your crypto mining potential effortlessly.
- Build a Profitable Passive Income Box with Low-Powered Hardware: A Guide
Learn how to set up a low-powered passive income crypto miner using a Raspberry Pi or Intel NUC, and earn $10-$20 per month per box with this guide
- ADSB SDR Adapter Performance in Flight Tracking: Key Insights and Comparisons
Discover the Best ADS-B Receiver and Surprising SDR Insights. Make Informed Choices for SDR Technology. Click for Expert Recommendations!