
DIY Onocoy Ntrip Server and Reference Station Setup

Table of Contents
DIY Onocoy Reference Station Setup Guide
In this guide, we’ll walk you through the process of setting up your own GPS Onocoy server using cost-effective hardware options and reliable GPS receivers. Whether you’re interested in enhancing the accuracy of your location-based applications, conducting precision surveys, or simply exploring the world of DIY technology, this guide provides step-by-step instructions to help you get started with creating your DIY Onocoy reference station.
What is Onocoy?: Advancing GNSS Correction Data
Onocoy is an innovative platform that harnesses GNSS devices and correction data to create a decentralized network for precise positioning and navigation. It offers users the opportunity to contribute to this network while earning rewards based on their data contributions.
Enhancing Your GNSS and RTK Setup
Onocoy offers a fresh perspective on GNSS stations. Beyond pinpoint accuracy, it’s about becoming part of a global network that benefits users worldwide. Discover the key considerations for setting up your station: from selecting the right equipment to optimizing antenna placement and ensuring reliable internet connectivity.
Contribution and Rewards
At its heart, Onocoy not only improves accuracy but also recognizes your contributions. Uncover how your role in enabling specific NTRIP messages and maintaining low latency translates into tangible rewards. Onocoy’s approach ensures a fair distribution of rewards through blockchain technology, providing transparency in recognition.

Understanding Onocoy’s GNSS Capabilities and Requirements.
Exploring the GNSS capabilities of Onocoy sheds light on the diverse channels and bands it supports. As a rule of thumb, a broader range of bands and constellations translates to enhanced rewards within the network. For an in-depth understanding, refer to the insights shared in section 4.2.1 of the whitepaper, which is accessible on LinkedIn here and soon on the official website.
Update rates, a crucial factor, cater differently to miners and RTK Rovers, who are the data consumers utilizing the Onocoy service. Miners find stability with a rate of 1Hz, ensuring steady data contribution. In contrast, higher update rates like 10Hz, 20Hz, or even 100Hz predominantly serve RTK Rovers’ needs for real-time precision.
Addressing the notion of minimum required position accuracy, Onocoy adopts a pragmatic approach. Straying from stringent demands, the system’s meticulous processing accurately determines device positions during validation steps, ensuring reliability without undue accuracy expectations.
Signal-to-Noise Ratio (SNR) and signal levels emerge as pivotal factors. SNR above 40 dBHz, preferably reaching around 45 dBHz, signifies optimal performance. Lower SNR values, stemming from factors like extended cables or antenna quality, can elevate code/carrier noise, potentially affecting measurement quality. Two fundamental principles guide this aspect:
- Ensuring an unobstructed 360-degree sky view for the antenna, ensuring unhindered signal access.
- Aiming for a secure and stable antenna mount to counteract vibrations and instability.
This comprehensive approach forms the bedrock of reliable and robust data contribution to the Onocoy network.
Why DIY a Onocoy Reference Station?
Creating your own DIY Onocoy reference station offers several compelling advantages. Firstly, it provides a cost-effective solution, enabling you to save on setup expenses while achieving high precision in location-based applications. Secondly, the customization options allow you to tailor the hardware and software to your specific needs, enhancing flexibility and adaptability. Moreover, DIY setup empowers you with a deeper understanding of the technology, enabling you to troubleshoot and innovate. Lastly, contributing to the Onocoy network not only improves your own accuracy but also lets you play a vital role in advancing global navigation systems while earning rewards for your data contributions.
Ideal Setup Setup For Onocoy
For Onocoy, we recommend the following components for an optimal setup. This combination ensures high precision, versatility, and reliable performance.
This combination ensures a powerful computing platform with the Beelink U59 Mini PC, coupled with the high-precision positioning provided by the UM980 RTK GNSS USB Dongle and the reliable performance of the HARXON CSX627A Triple Band RTK Antenna. The recommended GNSS USB Dongle is our preferred choice for its exceptional precision and features, making it the ideal solution for Onocoy applications.
Below we’ve included other alternatives.
Recommended Hardware for Onocoy:
One of the following is required. We basically just need any efficient and low powered computer we can get our hands on that also runs Linux. Any Raspberry PI, Intel NUC, or similar will do. They don’t have to be all that powerful. However, we will recommend you have at least 32g-64g of flash-based storage (for longevity of the SSD). For this, we will be targeting a budget of around $50-$200 for compute hardware, but feel free to go higher if it suits your needs. Our power target is approximately 10w average.
Raspberry Pi and Pi Clones:
Hard to get ahold of these days but they are super low power and are quite customizable. For info on how to install Raspbian on your Raspberry PI.
Any Mini PC with Intel N5100 or similar:
For super low power Raspberry Pi equivalent but on x64 platform.
Ultra Low Power / Low Budget
Compute Notable Mentions
Older Raspberry Pi models (1, 2, 3) should be sufficient. But newer models should be significantly more efficient and allow you do run multiple low powered mining setups on a single device. This is why we recommend newer compute hardware.
Recommended GPS Receivers for DIY Onocoy Deployments
There are many receivers on the market but at a bare minimum it must support RTCM (Radio Technical Commission for Maritime Services) and ideally have the ability to be hooked up to an antenna outside of the install location with 360 degree unobstructed view of the sky.
- U-Blox Based Receivers
- NEO-M8P RTK GPS GNSS receiver board with SMA and mini USB for UAV, Robots
- $150
- Single-Band (L1 only), 72 Channels, supports USB; I2C; and UART, Accurate within 6 feet, 10hz pull rate. Rewards will be limited, 8-10% only.
- Shows up as
/dev/ttyACM0instead of/dev/ttyUSB0in the instructions below. Same goes for all U-BLOX based devices.
- NEO-F9P-15B Multi-band
- $220
- Dual-Band L1+L2 (or L1+L5), 184 Channels, supports USB only, Accurate within 6 feet, 20hz pull rate. Rewards will be limited, 30% of possibly maximum rewards.
- SparkFun GPS-RTK Board - NEO-M8P-2 (Qwiic)
- $180
- NEO-M8P-2 Based, Single-Band (L1 only), 6 Foot Accuracy. Rewards will be limited, 8-10% only.
- SparkFun GPS-RTK-SMA Breakout - ZED-F9P (Qwiic)
- $275
- ZED-F9P Based, Dual-Band L1+L2 (or L1+L5), 184 Channels, 20hz pull rate, USB or GPIO Breakout. Rewards are limited, 30% of possibly maximum rewards.
- ZED-F9P RTK GNSS receiver board with SMA Base or Rover
- $210
- ZED-F9P Based, Dual-Band L1+L2 (or L1+L5), 184 Channels, 20hz pull rate, USB Only. Rewards are limited, 30% of possibly maximum rewards.
- NEO-M8P RTK GPS GNSS receiver board with SMA and mini USB for UAV, Robots
- $150
- Unicorecomm UM980/UM982 Based USB Receivers
The preferred option overall and by far for almost every setup.
Requires
FTDI Drivers
.
- (Preferred)
UM980 RTK GNSS USB Dongle
- $225
- Unicorecomm UM980 Based, Triple Band L1, L2 and L5, All-Constellation, High Precision, 1408 Channels, 20hz pull rate, 80% Rewards.
- Use discount code
SIMEONSECURITY_GNSSfor an additional 5% discount.
- (Preferred)
UM982 Dual Channel RTK GNSS USB Dongle
- $235
- Unicorecomm UM982 Based, Triple Band L1, L2 and L5, All-Constellation, High Precision, 1408 Channels, 20hz pull rate, 80% Rewards.
- Use discount code
SIMEONSECURITY_GNSSfor an additional 5% discount.
- (Preferred)
UM980 RTK GNSS USB Dongle
- $225
Advanced Receivers for DIY Onocoy Deployments
These are all going to be devices that are Triple-Band, High Pull Rate, Extreme Position Receivers. They likely won’t support USB. They will require PCI-E, UART, I2C, or Serial Connections. If you don’t know what that is or you aren’t experienced, please use the options above. However these will allow you to be capable of at most 80% of Onocoy Rewards in the case of the Unicorecomm UM980 and Unicorecomm UM982 based boards and 100% of rewards in the Septentrio Mosaic X5 based boards. While you’ll be able to use the same software we mention below, the instructions we’ve provided won’t exactly line up. Be advised.

Unicorecomm UM980 Capable of 80%-90% of the Onocoy rewards if installed correctly. 100% is possible after planned future firmware update. Fimware updates are dependent on the manufacture of the device providing them. Unicorecomm will not provide them to the public.
- UM980 module
+
DSD TECH SH-U05A USB to I2C
+
GH1.25 to Dupont2.54 Pre-Crimped Cables
- $180 - $220
- Unicorecomm UM980 Based, Triple Band L1, L2 and L5.
- For more details on how to install this, we recommend you read this article on how to set up the I2C connection on the UM980
- Don’t expect the aliexpress manufactures to be able to provide firmware updates.
- UM980 M.2
- Unicorecomm UM980 Based, Triple Band L1, L2 and L5.
- May not be recognized by all systems, it uses USB protocols over M.2
- Use discount code
SIMEONSECURITY_GNSSfor an additional 5% discount.
- UM980 mPCIe
- Unicorecomm UM980 Based, Triple Band L1, L2 and L5.
- May not be recognized by all systems, it uses USB protocols over mPCIe
- Use discount code
SIMEONSECURITY_GNSSfor an additional 5% discount.
- UM980 module
+
DSD TECH SH-U05A USB to I2C
+
GH1.25 to Dupont2.54 Pre-Crimped Cables
- $180 - $220
Unicorecomm UM982 Capable of 80%-90% of the Onocoy rewards if installed correctly. 100% is possible after planned future firmware update. Fimware updates are dependent on the manufacture of the device providing them. Unicorecomm will not provide them to the public.
- UM982 M.2
- Unicorecomm UM982 Based, Triple Band L1, L2 and L5.
- May not be recognized by all systems, it uses USB protocols over M.2
- Use discount code
SIMEONSECURITY_GNSSfor an additional 5% discount.
- UM982 mPICe
- Unicorecomm UM982 Based, Triple Band L1, L2 and L5.
- May not be recognized by all systems, it uses USB protocols over mPCIe
- Use discount code
SIMEONSECURITY_GNSSfor an additional 5% discount.
- UM982 M.2
Septentrio Mosaic X5 Capable of up to 100% of the Onocoy rewards. Requires already available firmware update .
- mosaic-go GNSS module receiver evaluation kit
- Septentrio Mosaic X5 Based, 50-100hz Pull Rate, Anti-Interference, Anti-Jamming, Anti-Spoofing.
- (Preferred)
simpleRTK3B mPCIe
- Septentrio Mosaic X5 Based, 50-100hz Pull Rate, Anti-Interference, Anti-Jamming, Anti-Spoofing.
- mosaic-go GNSS module receiver evaluation kit
Recommended Antennas for Onocoy
We’ve covered this in a more in depth guide about the Best GPS Base Station Antennas .
Basic Antennas for Onocoy

For U-Blox based receivers, we recommend the following antenna options to enhance GPS navigation accuracy.
Advanced Antennas for Onocoy

Antenna Options for Recommended GNSS Receivers:
For optimal performance with the recommended GNSS receivers, we suggest the following antenna options to ensure accurate and reliable navigation.
OS Installation:
We won’t go into the technical details of how to install an operating system here. However here are some great resources to get you started.
Raspbian:
Ubuntu:
- Install Ubuntu desktop
- Ubuntu Server - Basic installation
- Ubuntu Complete Beginner’s Guide: Download & Installing Ubuntu
Proper Onocoy Base Station Antenna Placement

Installed Antenna - doc.onocoy.com
Onocoy has published antenna placement requirements , but to summarize you should understand the following:
Optimal Location Selection: To optimize station placement,** choose a location at least 20 kilometers away from the nearest Onocoy station**. Stations located close to three or more others will receive reduced rewards. Utilize the Onocoy Explore function to easily check the distance to the nearest Onocoy station for any location.

Onocoy Explorer - doc.onocoy.com
Ideal Surroundings: Ensure that the antenna has an unobstructed 360-degree view of the sky, with no obstructions such as buildings, trees, or mountains above 10 degrees elevation. Limited sky visibility or signal multipath can result in scaled-down rewards. The antenna must be rigidly mounted to prevent movement exceeding 1-2 millimeters, as excessive vibrations or movement can lead to reward pausing.
Stable Internet Connection: Maintain a stable and permanent internet connection for the station. The required bandwidth is relatively low, typically around 1 kB/s, and no inbound traffic is necessary. There is no need to open ports on typical firewalls, as connections are established from inside-out.
Setting up the Onocoy Base Station and NTRIP Software
Once you’ve set up your device and properly placed your antenna , you can start configuring the required software.
For this section we assume some basic technical experience and that you have installed your operating system already as well as know how to get into the terminal.
- We need to create an account and get our credentials from the onocoy website . You will need to grab the server address, username, password, and port number from this step. Once it is completed, go to the reference station tab and grab the mount point, which we also need.
- Refer to the Onocoy documentation if you need help.
Install some base dependencies.
sudo apt install -y gpsd gpsd-clients minicom socat git make build-essentialFollow one of the Options Below. Either NTRIP Server or RTKLIB
Wait and Verify Your Station on the Onocoy Dashboard
- Visit the Onocoy Console Dashboard and check to see your device has finished it’s validation period. If it hasn’t check back later, it can take up to 3 days.
Profit?
- You can view the following Onocoy documentation to learn more.
Option 1: NTRIP Server
On your linux device download the ntripserver software.
git clone https://github.com/simeononsecurity/ntripserver.git
cd ./ntripserver
make
Identify the USB Source
- Idendify that linux recognizes the device is plugged in.
lsusbEx.
Bus 00x Device 00x: ID xxxx:xxxx Prolific Technology, Inc. PL2303 Serial Port / Mobile Action MA-8910PorBus xxx Device xxx: ID xxxx:xxxx U-Blox AG [u-blox 8]- Identify the propper ttyUSB/ttyACM path.
Note: Some devices may show up as
ttyUSB0,ttyACM0, etc. You’ll have to look this up per your device.*
ls /dev/ttyUSB*Note: Minicom is a tool used to view the serial output of devices. To use it, you’ll need to read this guide on using minicom . If this sounds difficult to you, skip this step.
sudo minicom -D /dev/ttyUSB0Now we get to configure the software
Note: The onocoy dashboard/explorer won’t provide you with the mountpoint information until they verify you can send them data. Omit the mountpoint details from this section until after you initially get past that window. Then test it again.
Test the configuration.
~/ntripserver/ntripserver -M 1 -i /dev/ttyUSB0 -b 921600 -O 1 -a servers.onocoy.com -p 2101 -m {{mountpointhere}} -n {{usernamehere}} -c {{passwordhere}}Now that you confirmed it works. We need to create a service to have it restart on boot.
- Create a Service File:
sudo nano /etc/systemd/system/ntripserver.serviceRemember to replace
/path/to/ntripserverwith the actual path to your ntripserver executable.[Unit] Description=NTRIP Server Service After=network.target Wants=network-online.target After=network-online.target [Service] ExecStart=/path/to/ntripserver -M 1 -i /dev/ttyUSB0 -b 921600 -O 1 -a servers.onocoy.com -p 2101 -m {{mountpointhere}} -n {{usernamehere}} -c {{passwordhere}} Restart=always RestartSec=120 # 2 minutes (in seconds) TimeoutStartSec=300 # Set a 5-minute timeout (adjust as needed) User=root [Install] WantedBy=default.target- Enable and Start the Service:
sudo systemctl enable ntripserver.service sudo systemctl start ntripserver.service- Check the Service Status:
sudo systemctl status ntripserver.serviceex.
ntripserver[815]: serial input: device = /dev/ttyUSB0, speed = 921600
systemd[1]: Started NTRIP Server Service.
ntripserver[815]: caster output: host = xxx.xxx.xxx.xxx, port = 2101, mountpoint = Mount1, mode = http
ntripserver[815]: transfering data ...
Serial Connection Settings
Note: Always consult your receiver manufactures documentation to get the correct serial connection information such as
baud rate,data bits,partity, andstop bits.
Known Default Serial Settings for the Following GPS Receivers
| GPS Receiver | Baud Rate (bps) | Data Bits | Parity | Stop Bits |
|---|---|---|---|---|
| UM980 | 115200 | 8 | None | 1 |
| UM982 | 115200 | 8 | None | 1 |
| Bynav M20 | 115200 | 8 | None | 1 |
| Bynav M21 | 115200 | 8 | None | 1 |
| Ublox F9P | 38400 | 8 | None | 1 |
| Ublox M8* | 9600 | 8 | None | 1 |
Option 2: STR2STR
Download and Install RTKLIB
If RTKLIB is not already installed, you can download and compile it from the official repository:
git clone https://github.com/tomojitakasu/RTKLIB.git
cd RTKLIB/app/str2str/gcc
make
Identify the USB Source
- Check if Linux Recognizes the Device
lsusbExample output:
Bus 00x Device 00x: ID xxxx:xxxx Prolific Technology, Inc. PL2303 Serial Port / Mobile Action MA-8910PorBus xxx Device xxx: ID xxxx:xxxx U-Blox AG [u-blox 8].- Determine the Proper ttyUSB/ttyACM Path
ls /dev/ttyUSB*Note: Some devices may appear as
ttyUSB0,ttyACM0, etc., depending on your hardware.Optional: If you want to view the serial output, you can use Minicom:
sudo minicom -D /dev/ttyUSB0For more details, refer to the guide on using Minicom .
Configure str2str
Test the Configuration
Replace placeholders with your specific values:
${USB_PORT}: The detected USB port (e.g.,/dev/ttyUSB0).${BAUD_RATE}: Baud rate specific to your device.${DATA_BITS},${PARITY},${STOP_BITS}: Serial port settings.${ONOCOY_PASSWORD}: Your password for the NTRIP server.${ONOCOY_USERNAME}: Your username for the NTRIP server.${ONOCOY_USERNAME}: Your mountpoint for the NTRIP server.${RTCM_MSGS}: RTCM messages you want to send. Ex.1005(30),1006(30),1007(30),1019,1033(30),1042,1044,1045,1046,1077(1),1087(1),1097(1),1107(1),1117(1),1127(1),1137(1),1230(1)
str2str -in serial://${USB_PORT}:${BAUD_RATE}:${DATA_BITS}:${PARITY}:${STOP_BITS} \
        -out "ntrips://${ONOCOY_USERNAME}:${ONOCOY_PASSWORD}@servers.onocoy.com:2101/${ONOCOY_MOUNTPOINT}#rtcm3"" \
        -msg "$RTCM_MSGS" -b 0 -t 5 -s 30000 -r 30000 -n 1
Create a Service to Restart on Boot
Create a Service File:
sudo nano /etc/systemd/system/str2str.serviceReplace
/path/to/str2strwith the actual path to yourstr2strexecutable.[Unit] Description=RTKLIB str2str Service After=network.target Wants=network-online.target After=network-online.target [Service] ExecStart=/path/to/str2str -in serial://${USB_PORT}:${BAUD_RATE}:${DATA_BITS}:${PARITY}:${STOP_BITS} \ -out "ntrips://${ONOCOY_USERNAME}:${ONOCOY_PASSWORD}@servers.onocoy.com:2101/${ONOCOY_MOUNTPOINT}#rtcm3" \ -msg "$RTCM_MSGS" -b 0 -t 5 -s 30000 -r 30000 -n 1 Restart=always RestartSec=120 # 2 minutes (in seconds) TimeoutStartSec=300 # Set a 5-minute timeout (adjust as needed) User=root [Install] WantedBy=default.targetEnable and Start the Service:
sudo systemctl enable str2str.service
sudo systemctl start str2str.service
Check the Service Status:
sudo systemctl status str2str.service
Serial Connection Settings
Known Default Serial Settings for GPS Receivers
| GPS Receiver | Baud Rate (bps) | Data Bits | Parity | Stop Bits |
|---|---|---|---|---|
| UM980 | 115200 | 8 | None | 1 |
| UM982 | 115200 | 8 | None | 1 |
| Bynav M20 | 115200 | 8 | None | 1 |
| Bynav M21 | 115200 | 8 | None | 1 |
| Ublox F9P | 38400 | 8 | None | 1 |
| Ublox M8* | 9600 | 8 | None | 1 |
Always consult your receiver manufacturer’s documentation for the correct serial connection information.
Windows Option 1: STRSVR
On windows, one of our best options and arguably our best free option is STRSVR , which is based on RTKLIB.
Download and save
STRSVR.exefrom the github releases page . Be sure to save it to a good location that you can easily find again later.Execute
STRSVR.exe, selectSerialas your input device, and configure the correct COM Port for your serial reciever.
STRSVR Serial Configuration
Note: Your com port will be different on your device. Consult your manufactures documentation and the Windows Device Manager on to identify the correct com port
- Select
NTRIP Serveras one of your output devices and configure it using the credentials and settings you got from the onocoy console .
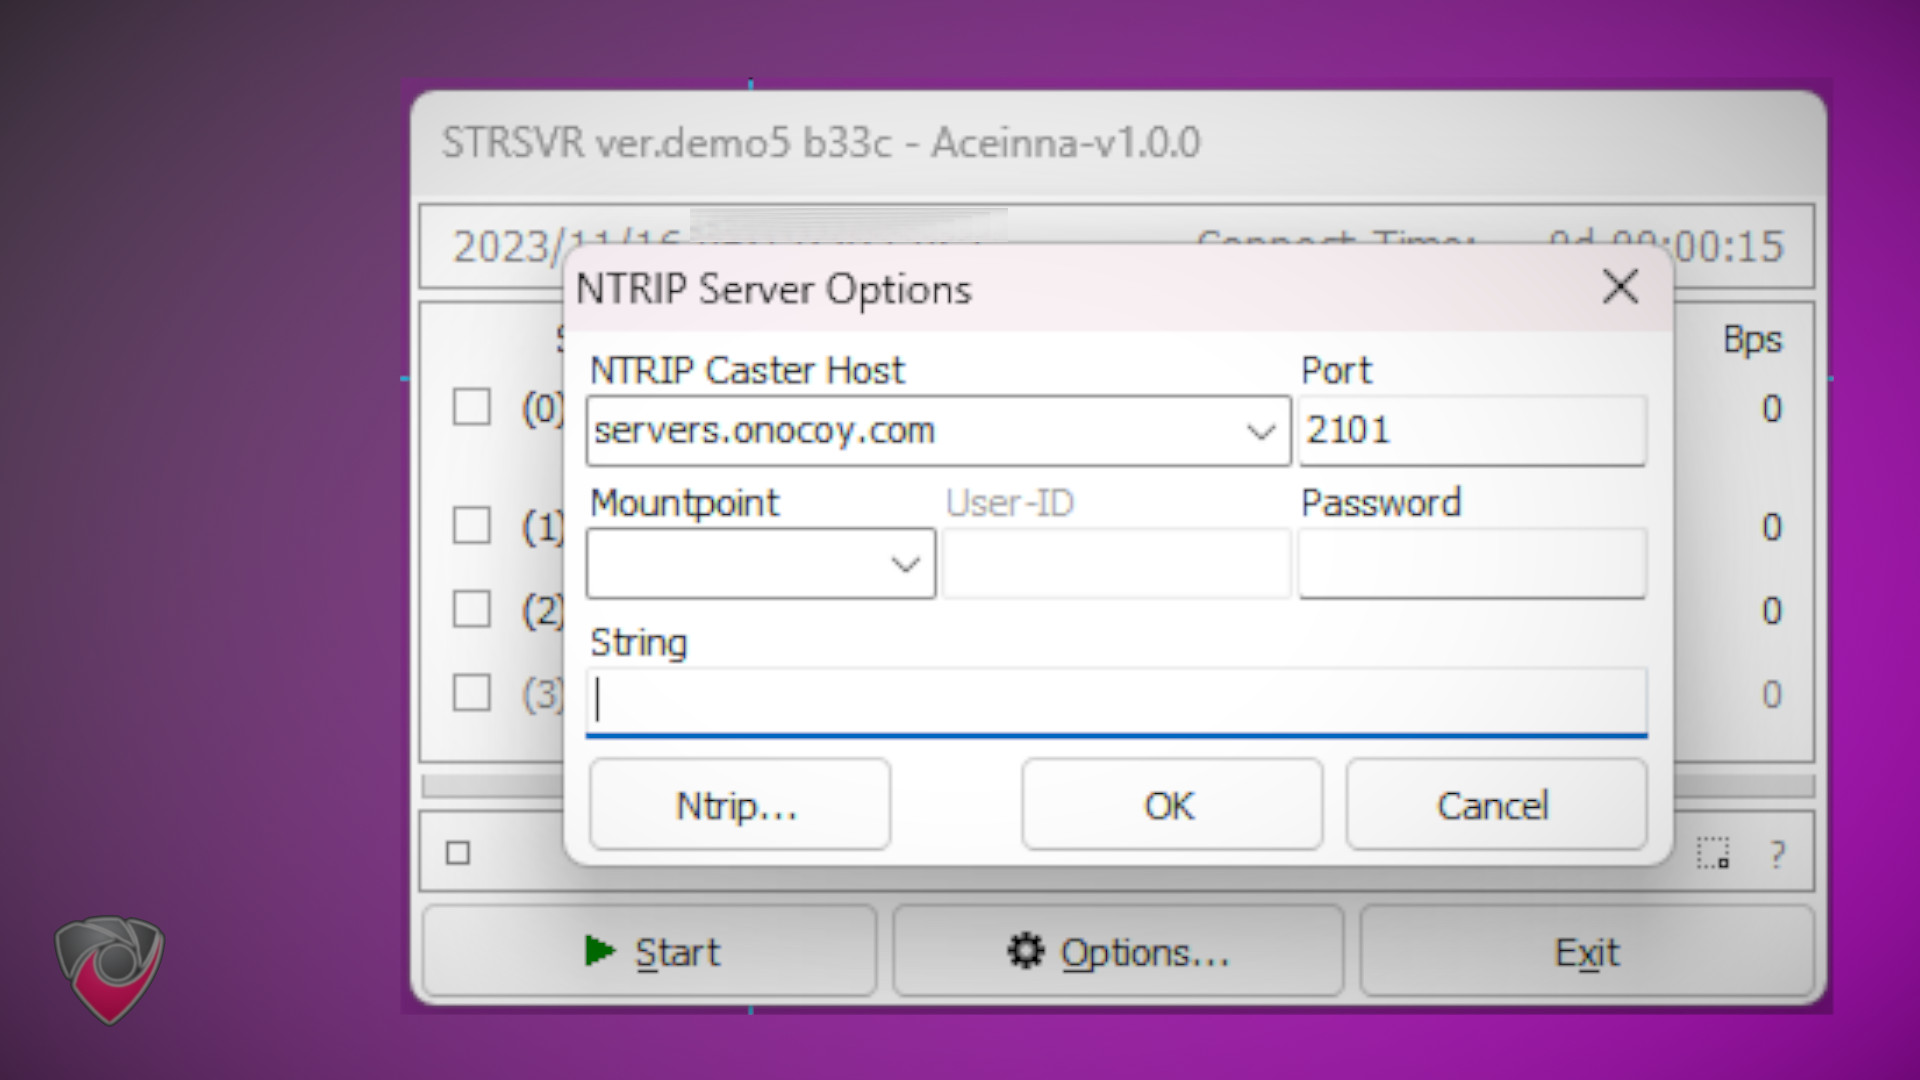
STRSVR NTRIP Server Configuration
- Hit the
Start Button
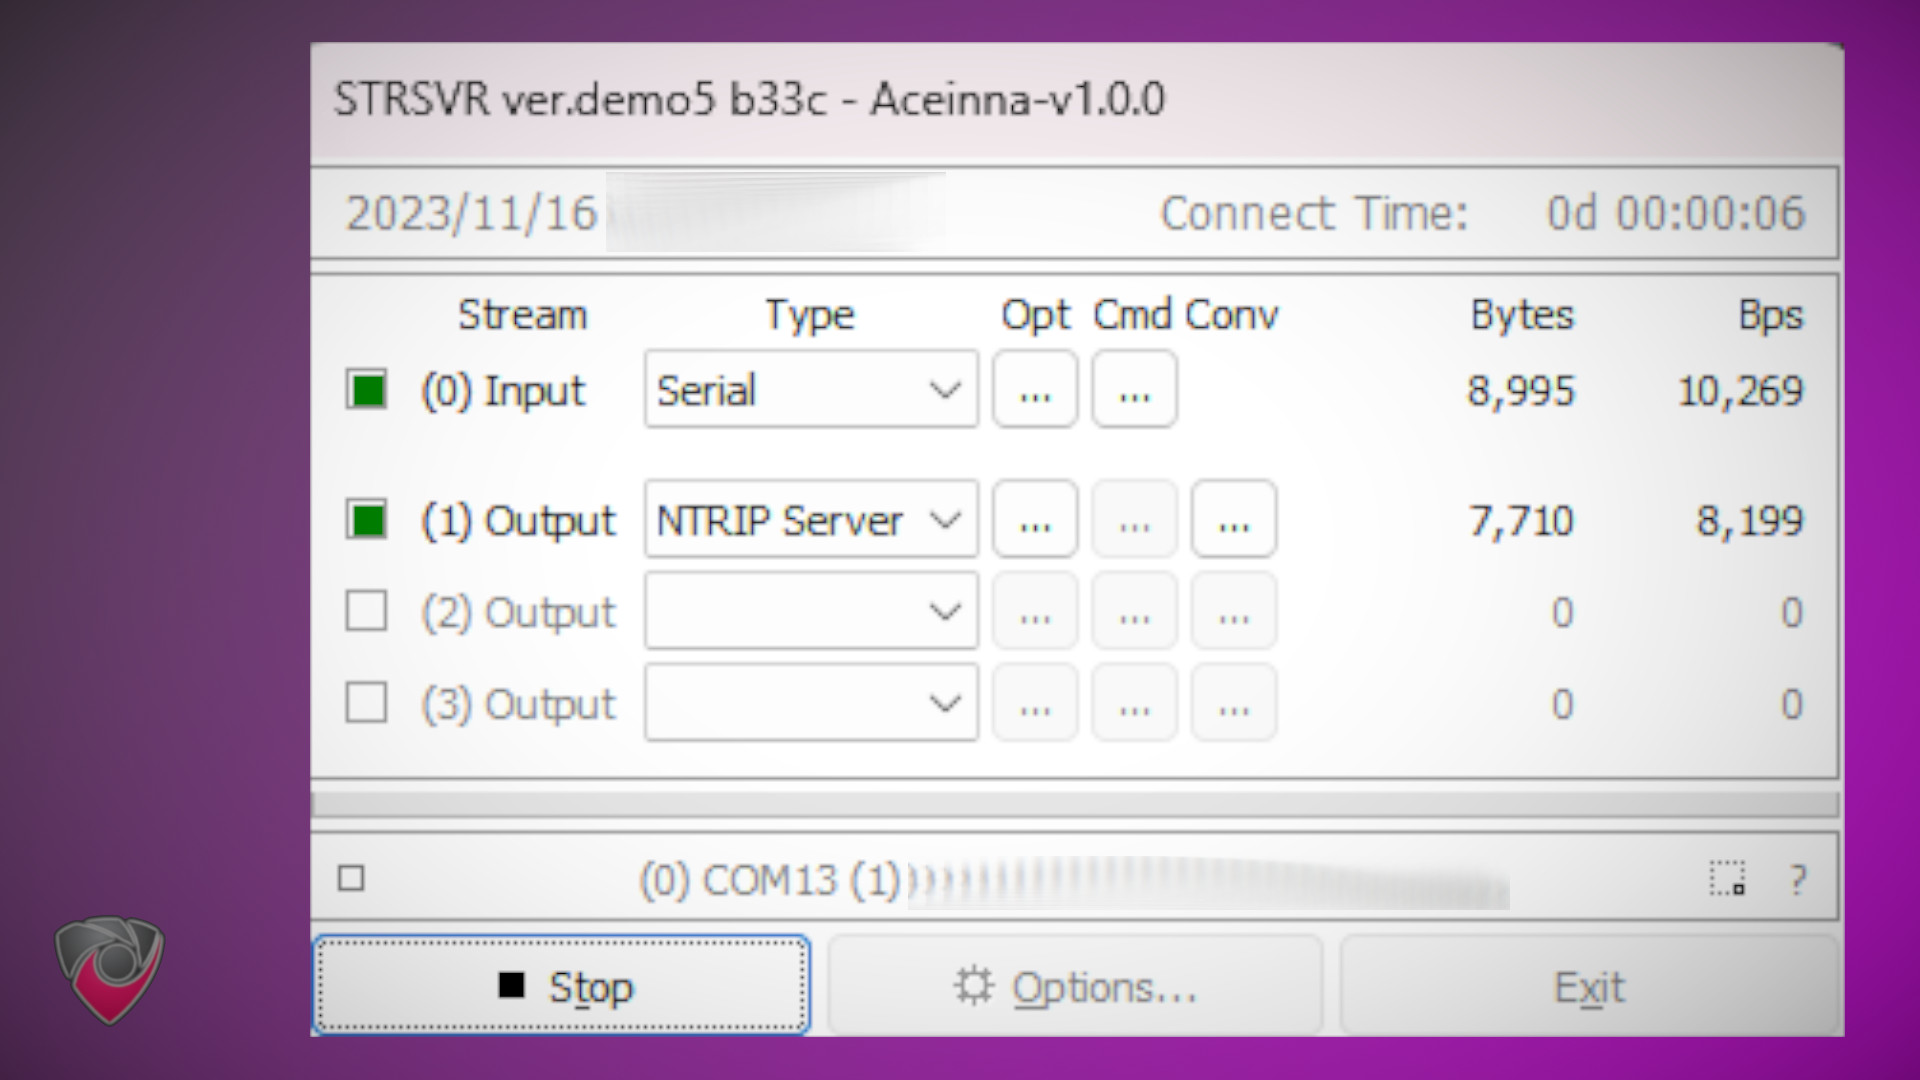
STRSVR DEMO
Serial Connection Settings
Note: Always consult your receiver manufactures documentation to get the correct serial connection information such as
baud rate,data bits,partity, andstop bits.
Known Default Serial Settings for the Following GPS Receivers
| GPS Receiver | Baud Rate (bps) | Data Bits | Parity | Stop Bits |
|---|---|---|---|---|
| UM980 | 115200 | 8 | None | 1 |
| UM982 | 115200 | 8 | None | 1 |
| Bynav M20 | 115200 | 8 | None | 1 |
| Bynav M21 | 115200 | 8 | None | 1 |
| Ublox F9P | 38400 | 8 | None | 1 |
| Ublox M8* | 9600 | 8 | None | 1 |
Windows Option 2: SNIP
On windows, our options are limited. One of the NTRIP communities favorite options for Windows is Snip . While there is a trial available, you’ll need to purchase the software long term if you plan on ever using it for more than an hour at any given time.
- Download and install Snip from the download page .
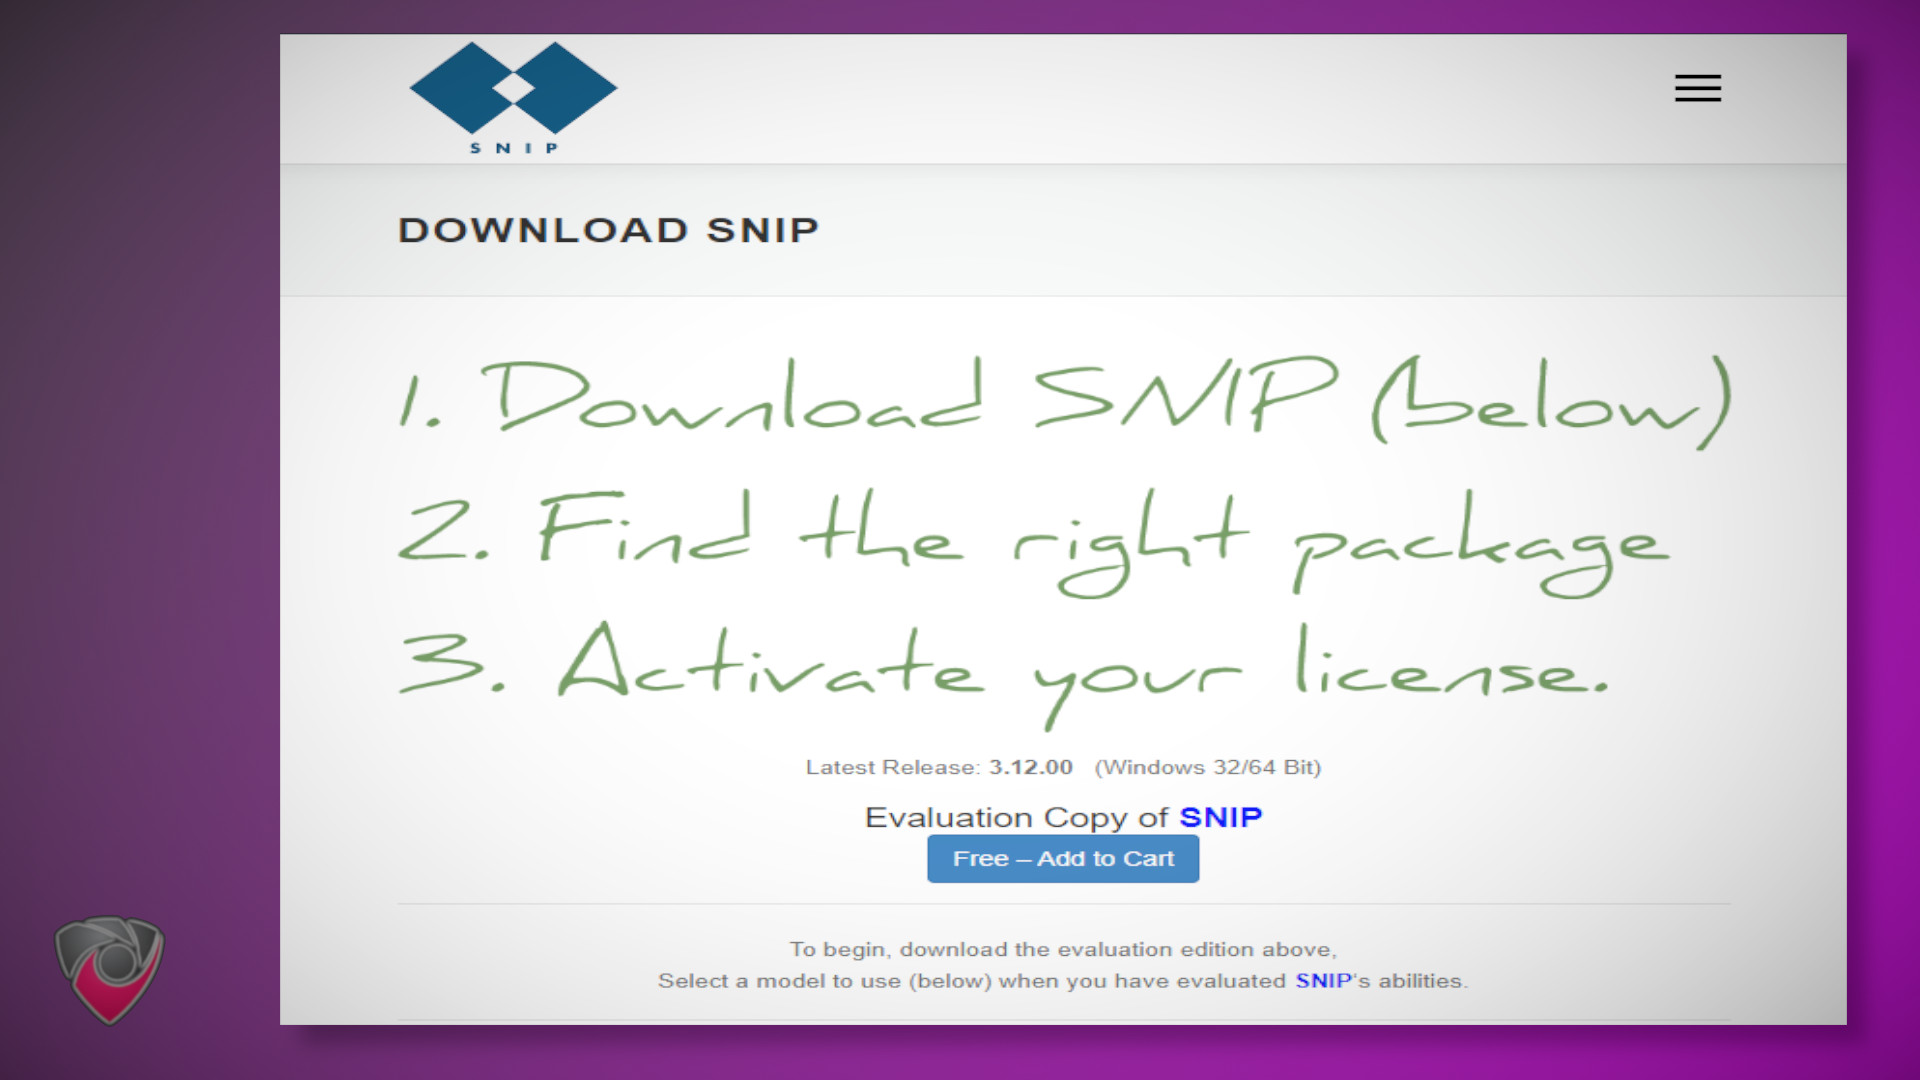
Snip Download Page
You’ll have to give them an email and get the download link in your email. Use a service like 10minutemail to avoid getting spam in your email.
- Once installed, go to the relay streams tab tab and delete all options from that page.
Snip Relay Streams Menu - use-snip.com
- Under the Serial Streams Tab add your COM device and create a serial stream device.
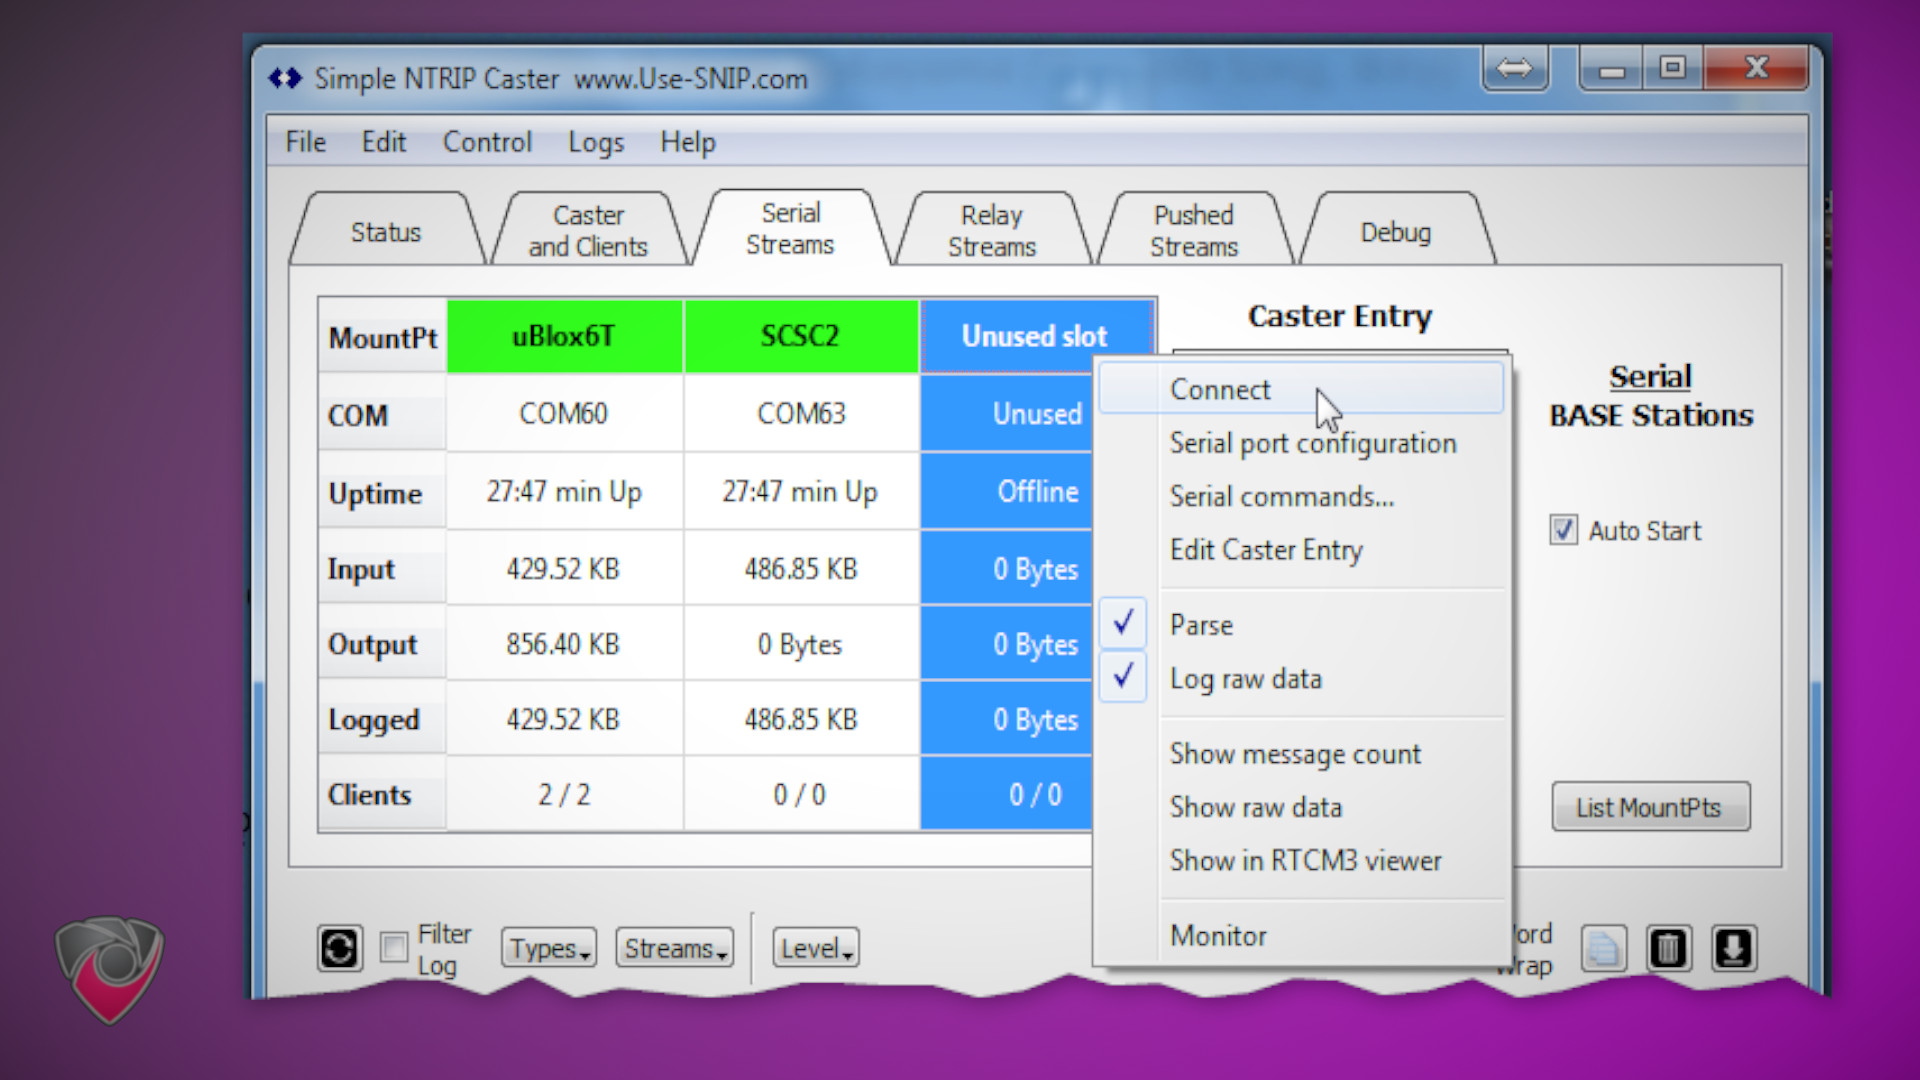
Snip Serial Streams Menu - use-snip.com
Learn more about how to add a serial stream source device on Snip
- On the Pushed-Out Data Tab manually add the Ntrip server information from the onocoy console .
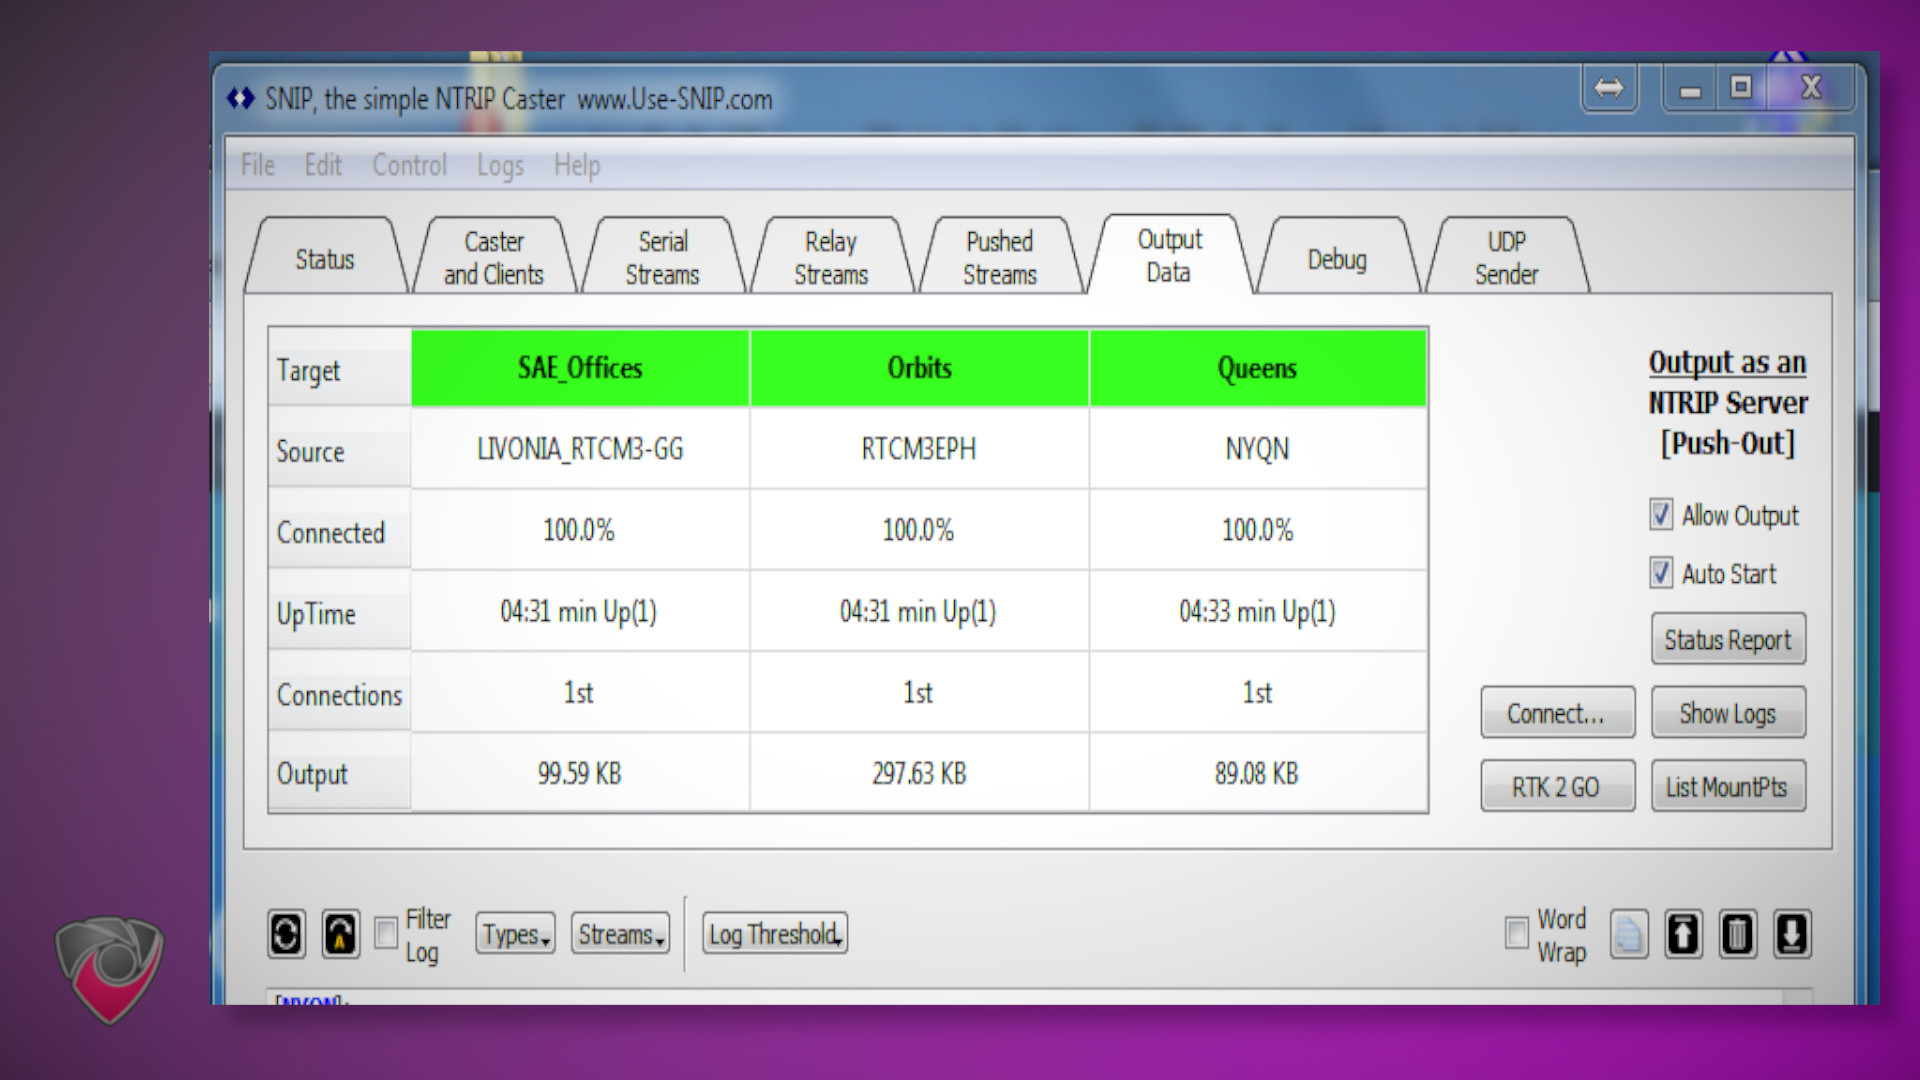
Snip Pushed-Out Data Menu - use-snip.com
Serial Connection Settings
Note: Always consult your receiver manufactures documentation to get the correct serial connection information such as
baud rate,data bits,partity, andstop bits.
Known Default Serial Settings for the Following GPS Receivers
| GPS Receiver | Baud Rate (bps) | Data Bits | Parity | Stop Bits |
|---|---|---|---|---|
| UM980 | 115200 | 8 | None | 1 |
| UM982 | 115200 | 8 | None | 1 |
| Bynav M20 | 115200 | 8 | None | 1 |
| Bynav M21 | 115200 | 8 | None | 1 |
| Ublox F9P | 38400 | 8 | None | 1 |
| Ublox M8* | 9600 | 8 | None | 1 |
Troubleshooting and Verifying GPS Connectivity on Linux
- Stop the ntripserver service
sudo systemctl stop ntripserver.service
- Use a GPS tool to verify connectivity
- First, make sure you have gpsd installed:
sudo apt-get install gpsd - Then start gpsd to connect to your GPS device:
sudo gpsd /dev/ttyACM0 -F /var/run/gpsd.sock
gpsmon
- First, make sure you have gpsd installed:
- When finished either reboot your device or run
sudo systemctl start ntripserver.service
Troubleshooting Serial Connection Issues
Failures occur for several reasons:
1. Limiting the Frequency of Buffer Amplifiers
GNSS.store has TTL outputs on most boards. They come without buffer amplifiers and level shapers. The problem only exists on boards with RS232 output (and not just UART). There is a maximum of 230400 on RS232. Other boards support everything that the receiver can do. Many boards have USB with an FTDI chip, which supports up to 3 MHz.
| Type | Maximum Baud Rate (bps) | Notes |
|---|---|---|
| RS232 | 230400 | Limited by buffer amplifiers |
| USB | 3,000,000 | FTDI chip support |
2. Clock Frequency
If the receiver processor clock frequency is 16 MHz, then we can either use 883011 (divisor 19, deviation -4.2%) or 932067 (divisor 18, deviation +1%). What happens next depends on the computer’s COM port. Some work at any frequency, others fail. This problem is twice as bad with 921600 as it is with 460800. This is important for both TTL and RS232.
| Frequency | Divisor | Deviation |
|---|---|---|
| 883011 Hz | 19 | -4.2% |
| 932067 Hz | 18 | +1% |
3. Poor Ground Connection Causes Echo
A poor ground connection causes an echo. The echo from the transmitted signal mixes with the received one and causes reception errors. It is especially important for RS232, where it is better to have two ground wires: the signal ground and the shield ground from the connector body and the cable braid, which is connected first when the connector is plugged in. Good cables have two different grounds on the DB-9.
| Connection Type | Ground Requirement |
|---|---|
| RS232 | Signal ground and shield ground |
4. Signal Shape
The signal shape depends on the receiver, computer, wires, and connectors. If there are errors, use an oscilloscope. Instead of rectangular pulses, there may be distorted signals.
| Component | Potential Issue |
|---|---|
| Receiver | Signal shape distortion |
| Computer | Signal shape distortion |
| Wires | Signal shape distortion |
| Connectors | Signal shape distortion |
5. Safest and Worst Configurations
The safest configuration is a UART TTL to USB converter on the receiver board, built on an FTDI chip. The worst configuration is RS232 with DB-9 connectors.
| Configuration | Reliability |
|---|---|
| UART TTL -> USB (FTDI chip) | High |
| RS232 with DB-9 connectors | Low |
6. System Components
With the exception of USB, the system consists of a receiver, cable, connectors, and a computer. The error can be anywhere in this system.
| System Component | Potential Error Source |
|---|---|
| Receiver | Yes |
| Cable | Yes |
| Connectors | Yes |
| Computer | Yes |
By understanding and addressing these common issues, you can improve the reliability of your serial connections for GPS receivers.
Notible Mentions for Alternative Ntrip Server Software.
While reviewing this topic and discussing with the Onocoy team on their discord, I came across the following. These may work better for you but we didn’t cover them here. We may review them another time.
- Ntrip Server
- Seems to be a newer version of the software we used above. However it’s more difficult to access. It is created and maintained by the German Federal Agency for Cartography and Geodesy (BKG)
- RTKLIB STR2STR
- A more widely used NTRIP server. However it can be significantly more technically involved and only supports NTRIPv1.
- Hasn’t been updated in many years.
- rtklibexplorer/RTKLIB
- A version of RTKLIB optimized for single and dual frequency low cost GPS receivers, especially u-blox receivers. It is based on RTKLIB 2.4.3 and is kept reasonably closely synced to that branch.
- A fork of the original RTKLIB that is known to be more frequently updated and more optimized than the original RTKLIB.
- The variant of RTKLIB we use in our docker container.
- Also only supports NTRIPv1.
- esp32-xbee
- Exclusive to the ESP32, this software enables you to build even cheaper base stations. Or more expensive…
- Only supports NTRIPv1 communications.
Additional Configuration For Unicorecomm UM980 and UM982 Devices
To enable all the bands and base station mode on the Unicorecomm devices you’ll need to serial into them using baud rate of 115200 and run the following commands. This can be done within terminal, putty, or the
Unicorecomm UPrecise
software.
The provided configuration adjustments are made to ensure the proper functionality of the reference station receiver, specifically tailored for the Onocoy system . Click here understand What RTCM Messages Onocoy supports .
Unicorecomm UM980 and UM982 Configuration Script
Note: Not all of these commands will work on all UM980 or UM982 varients. Some commands are firmware specific some are redundant. Not all commands are required. These are just what we determined to be “most optimal” for most situations for both Onocoy and for any other service you may use your UM98x with. If there is a feature missing that you want, contact your device manufacture for firmware update instructions.
#RESET ALL SETTINGS TO FACTORY DEFAULTS
#FReset

#DISABLE ALL MESSAGE TYPES
UNLOG
UNILOGLIST
saveconfig

# Enable anti-jamming function
CONFIG ANTIJAM FORCE
saveconfig

# Maximum age of RTK data*, in seconds
CONFIG RTK TIMEOUT 600

# High reliability for RTK Positioning and ADR
CONFIG RTK RELIABILITY 4 4

# Enable multi-path mitigation
CONFIG MMP ENABLE

# RTCM Clock Offset Compensation
CONFIG RTCMCLOCKOFFSET ENABLE
saveconfig

# Doppler Position Prediction Configuration
CONFIG PSRVELDRPOS ENABLE

# Set up automatic base configuration with automatic gps location
mode base time 60 2 2.5

# Enable the Largest Signal Group
config signalgroup 2
saveconfig
config RTCMB1CB2a enable
saveconfig

# ONLY IF MODULE IS UM982
# Dual Antennas on UM982
# CONFIG SIGNALGROUP 3 6
# Single Antenna on UM982
# CONFIG SIGNALGROUP 7 0

#Disable Undulation Fixes per GNSS.STORE Recommended Configuration
saveconfig
CONFIG UNDULATION 0
saveconfig

#Enable NEMA Messages
gpgsv 1
gpgsa 1
gpggah 1
gpgsvh 1
gngga 1
gnrmc 1
#gpgll 1
#gpvtg 1
#gprmch 1
#gpgst 1
#gpzda 1

# Enable All bands
UNMASK GPS
UNMASK BDS
UNMASK GLO
UNMASK GAL
UNMASK QZSS
UNMASK IRNSS
UNMASK ALL
saveconfig

# ONOCOY RTCM CONFIGURATION (If doing more than just onocoy, skip this section and continue to the next)
rtcm1005 30
rtcm1033 30
rtcm1077 1
rtcm1087 1
rtcm1097 1
rtcm1117 1
rtcm1127 1
saveconfig

# Full RTCM 3.2 Configuration (Skip if only doing onocoy)
rtcm1006 30
rtcm1007 30
rtcm1019 1
rtcm1020 1
rtcm1033 30
rtcm1042 1
rtcm1044 1
rtcm1045 1
rtcm1046 1
rtcm1077 1
rtcm1087 1
rtcm1097 1
rtcm1107 1
rtcm1117 1
rtcm1127 1
rtcm1137 1
saveconfig

# Only configure if you know SBAS is available in your region
# Onocoy ignores SBAS you do not need to enable this unless you know what you're doing or you're following our dual or triple mining guides.
# CONFIG SBAS ENABLE Auto
# CONFIG SBAS TIMEOUT 600
# saveconfig

# Adjust Serial Output Settings
CONFIG COM1 115200 8 n 1
# ONLY CHANGE IF YOU WANT TO IMPROVE THE BAUDRATE OR IF YOU RUN INTO STABILITY ISSUES WITHOUT IT
# CONFIG COM1 921600 8 n 1
saveconfig
It should be noted that the Unicorecomm device does not have the ability to transmit the RTCM 1230 message type as required per
Onocoy system’s requirements
.
GNSS.STORE Suggested Base UM980 and UM982 Configurations
For setting up the UM980 and UM982 devices, GNSS.STORE provides detailed configuration guides to ensure proper functionality and optimal performance. The configurations are documented in the following links:
UM980 Configuration: UM980_RTCM3_OUT.txt
This guide includes steps to configure the UM980 for outputting RTCM3 messages. It covers the necessary commands and settings to enable the device to send accurate positioning data, which is crucial for applications requiring real-time kinematic (RTK) corrections.
UM982 Configuration: UM982_RTCM3_OUT.txt
Similar to the UM980, this guide provides detailed instructions for configuring the UM982 device. It outlines the commands and parameters needed to set up the device for RTCM3 message output, ensuring it can deliver precise GNSS data for various applications.
Unicorecomm UM980 and UM982 Commands Reference Manuals
For additional configuration guidance, consult the following documentation:
Following these suggested configurations helps in achieving reliable and accurate GNSS data transmission, essential for high-precision navigation and surveying tasks.
Symlinking Serial Devices to Hardcoded Path
When working with multiple serial devices, it’s common to encounter challenges related to device naming. By default, Linux assigns device names like ttyUSB0, ttyUSB1, etc., based on the order in which devices are connected. This can lead to confusion and issues when a specific device needs to be accessed consistently by the same name. One way to resolve this is by creating a symlink that assigns a stable, custom name to a device based on its attributes, such as its vendor and product IDs.
For instance, if you want your device to consistently appear as ttyUM980 instead of ttyUSB0, you can create a custom udev rule. Here’s how you can do it:
Create a udev Rule File:
udev rules are stored in the
/etc/udev/rules.d/directory. Each rule is defined in a separate file. In this example, we will create a file named00-um980.rules.$ sudo nano /etc/udev/rules.d/00-um980.rulesDefine the udev Rule:
Add the following rule to the file:
KERNEL=="ttyUSB[0-9]", ATTRS{idVendor}=="0403", ATTRS{idProduct}=="6015", SYMLINK+="ttyUM980"This rule does the following:
- KERNEL==“ttyUSB[0-9]”: Matches any device named
ttyUSBfollowed by a single digit. - ATTRS{idVendor}==“0403”: Matches devices with a vendor ID of
0403. This ID is unique to the manufacturer of the device. - ATTRS{idProduct}==“6015”: Matches devices with a product ID of
6015. This ID is unique to the specific product. - SYMLINK+=“ttyUM980”: Creates a symbolic link named
ttyUM980pointing to the matched device.
- KERNEL==“ttyUSB[0-9]”: Matches any device named
Identify Device Attributes:
To create an appropriate udev rule, you need to identify the vendor ID and product ID of your device. You can use the
lsusbcommand to list all USB devices and their attributes.$ lsusbThis command will output a list of connected USB devices. Look for your device in the list. For example:
Bus 002 Device 003: ID 0403:6015 Future Technology Devices International, Ltd FT231X USB UARTIn this example:
- The vendor ID is
0403. - The product ID is
6015.
You can also use the
udevadmcommand to get more detailed information:$ udevadm info --name=/dev/ttyUSB0 --attribute-walkThis command walks through the device tree and prints all attributes of the device, helping you identify the correct values for your udev rule.
- The vendor ID is
Apply the udev Rule:
After saving the file, reload the udev rules to apply the changes:
$ sudo udevadm control --reload-rulesVerify the Symlink:
Disconnect and reconnect your device. You should now see a new device named
ttyUM980in the/devdirectory, in addition to the usualttyUSB0.$ ls -l /dev/ttyUM980This should show a symlink pointing to the actual device, for example:
lrwxrwxrwx 1 root root 7 Jul 7 12:34 /dev/ttyUM980 -> ttyUSB0
By following these steps, you ensure that your device will always appear as ttyUM980, regardless of the order in which it’s connected. This is particularly useful in scripts or applications where a consistent device name is required.
Maintaining UPrecise Access with Linux using Socat or our Docker Container
To ensure uninterrupted UPrecise access when using Linux, you can utilize the socat application to connect to the UM980’s serial interface from a Windows machine.
Here’s the command to achieve this:
Note: If you’re using the docker container option above, you can skip this section and you can control the port you want to access the dongle by specifying the
TCP_OUTPUT_PORTvariable. It’ll function the same as below.
Replace {{portnumber}} with a port number of your choosing
sudo socat tcp-listen:{{portnumber}},reuseaddr /dev/ttyUSB0,b115200,raw,echo=0
Next, follow these steps to set up UPrecise on a Windows PC within the same network:
- Launch UPrecise.
- Navigate to the “Connections” menu.
- Select “TCP/IP” as the connection type.
- Enter the IP address of your Linux host and the port number specified in the previous command.
- You will now have access to the Data Stream and can continue sending commands as usual.
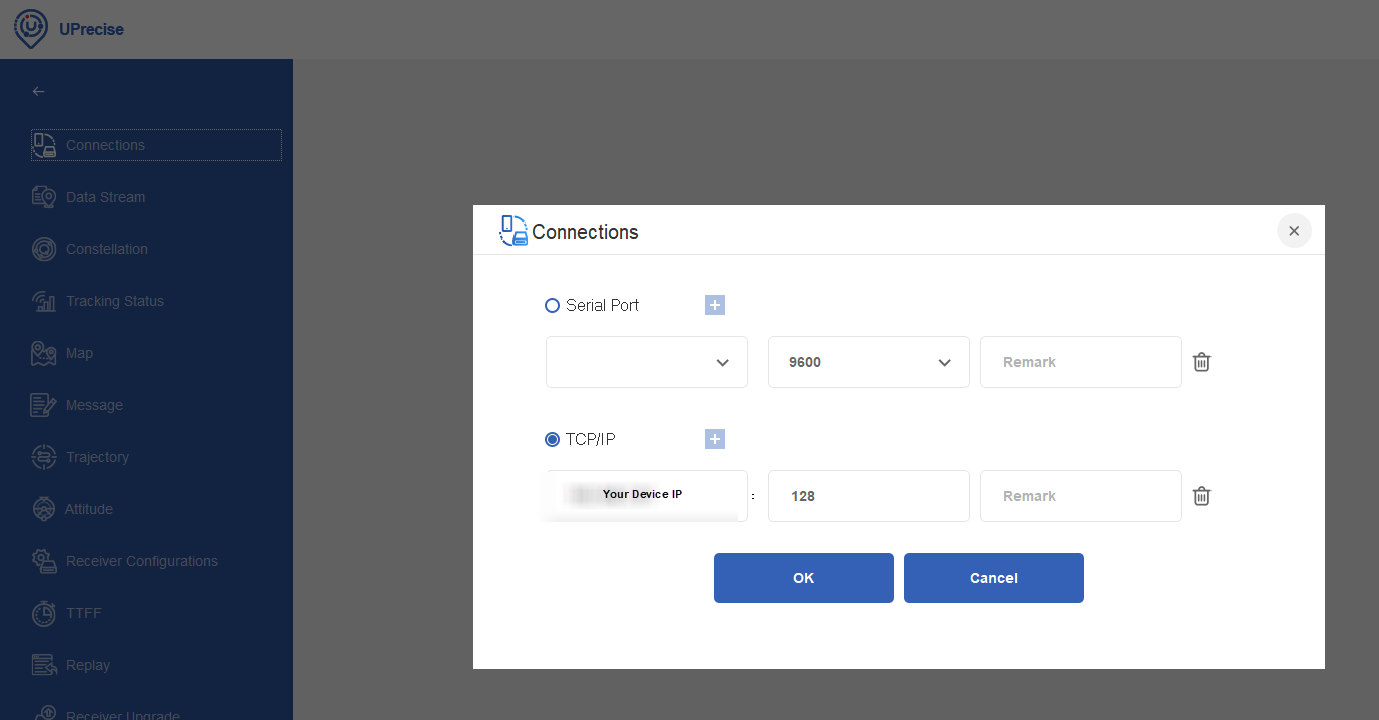
Unicorecomm Uprecise TCP Window - wholovesburrito.com
Onocoy FAQ
Onocoy Setup
Q1: Which equipment can be used to set up a station?
- A1: Any GNSS device capable of data transfer via NTRIP is recommended, with featured bundles listed on the dedicated onocoy device page or recommended in this article above .
Q2: Where should the antenna be placed?
- A2: Ideally, fix the antenna in a location with a full sky view, such as a roof, chimney, or open field. Ensure no obstructions exist above 10 degrees elevation angle, and secure the antenna against movement during adverse weather.
Q3: What is needed to connect the device, and is WiFi necessary?
- A3: A stable internet connection is required, whether through WiFi or Ethernet, depending on the device.
Q4: What happens if I want to change the location of my station/antenna/receiver?
- A4: Moving the device to another location is not a problem; you just need to successfully pass the data validation process again.
Onocoy Devices & Streams
Q5: Can streams be retrieved directly if my station only supports NTRIP caster and is exposed on the internet?
- A5: No, due to complexities, it is not a reliable method. Contact your station manufacturer to add NTRIP server functionality.
Q6: What NTRIP Messages need to be enabled on my GNSS reference receivers for the best rewards?
- A6: Enable RTCM 3.0 MSM7 Messages for optimal rewards, including messages for various constellations. Lower tier messages are supported, while certain message types are ignored.
Q7: What latency is tolerable from the GNSS receiver to the onocoy system?
- A7: The end-to-end latency should be below 1 second; larger latencies result in reduced rewards and potential disconnection.
Q8: Do I have to set the receiver in a special Reference station mode to determine its accurate location?
- A8: No, the onocoy system’s validation procedures determine the precise location of your station.
Q9: How does onocoy prevent fraudulent correction streams?
- A9: onocoy employs sophisticated methods, including regular data consistency checks, real-time supervision, and checks over long-term periods to detect fraudulent streams.
Q10: Can I provide data from a 3rd party service, such as public networks like IGS or other networks?
- A10: Yes, with acceptance of terms and conditions, provided you have the rights. Multiple submissions from free networks may result in banning.
Q11: My station frequently disconnects. What can I do?
- A11: Disconnections are observed due to updates but should not affect operations. No action is needed on the user’s network side.
Onocoy Rewards
Q12: My wallet is not connecting. What can I do?
- A12: Ensure you are using Chrome or Brave Browser on a Desktop device. Follow instructions on the page, and if issues persist, contact support through the onocoy discord .
Q13: How is the location scale calculated?
- A13: Factors include the number and distance of nearby stations, with the quality of neighboring stations influencing rewards.
Q14: How much will I earn streaming RTK correction data to onocoy?
- A14: Earnings depend on factors like signals, satellites, and location. Specific numbers are yet to be decided, but users can earn tokens even before they are officially listed.
Q15: Why does onocoy use blockchain technology?
- A15: onocoy uses blockchain to stabilize token prices, with mechanisms like required tokens for data access, constant burn, locked tokens for governance, a capped maximum supply, and a staking function.
Q16: How do I claim my rewards?
- A16: Click the “Claim Rewards” button in your NTRIP server list in the Onocoy Dashboard. Rewards can be claimed anytime, and changes in the reward factor trigger automatic claiming. Review your current balance in the upper right corner of the validator.
Conclusion
Setting up your own DIY GPS Onocoy server doesn’t have to be a daunting task. With the right hardware choices, reliable GPS receivers, and a clear understanding of the process, you can achieve remarkable precision and accuracy in your location-based applications.
By following the step-by-step instructions outlined in this guide, you’ve unlocked the potential to enhance your navigation, positioning, and surveying endeavors. The affordable hardware options, such as Raspberry Pi and Intel NUC , coupled with accurate GPS receivers, pave the way for effortless and efficient server setup.
So, go ahead and set up your Onocoy Reference Station, refine your skills, and enjoy the results that await you. Whether you’re navigating remote terrains, conducting surveys, or exploring new possibilities, your DIY Onocoy Reference Station will be your trusty companion in the pursuit of precision.
Stay inspired, stay innovative, and keep pushing the boundaries of what’s possible with technology.
Lastly, check out our article on more low powered mining setups .
or
References
- German Federal Agency for Cartography and Geodesy (BKG)
- NebulasIV Commands Reference Manual
- Ntrip Server
- Onocoy - Get GNSS correction data
- Onocoy - Connect your station to onocoy
- Onocoy - Whitepaper
- Onocoy - Linkedin
- Onocoy - Twitter
- Onocoy - Discord
- Onocoy - YouTube
- RTKLIB
- UM980 / UM982 Commands Reference Manual
- Unicorecomm UPrecise
- esp32-xbee
- WhoLovesBurrito - Chinese UM980 Dongle Implementation
Disclosure and Affiliate Statement:
Affiliate Disclosure: We may earn a commission from links on this page. These commissions support our website and the content we provide. Rest assured, we only recommend products/services we believe in. Thank you for your trust! Click Here to Learn More
Related Posts


This article refers to other articles we've written:
- Quadruple Mining DePin GPS Projects: Geodnet, Onocoy, RTKDirect, and FrysCrypto
Embark on a GPS revolution! Discover DIY triple mining with Geodnet, Onocoy, and RTKDirect for enhanced precision. Join a global network and save costs. Explore the future of navigation now!
- Unlock Precision: Build Your DIY RTKDirect Reference Station Today!
Explore DIY RTKDirect setup for enhanced GPS precision. Save costs, customize, and join a global network. Ready to revolutionize your navigation?
- Build a Profitable Passive Income Box with Low-Powered Hardware: A Guide
Learn how to set up a low-powered passive income crypto miner using a Raspberry Pi or Intel NUC, and earn $10-$20 per month per box with this guide
- Budget DIY GPS/GNSS Base Station / Receiver and NTRIP Server Client with ESP32 and UM980
Effortlessly set up a budget DIY GPS/GNSS base station and NTRIP Server / NTRIP Client using ESP32 and the Unicorecomm UM980 for accurate positioning.
- Unlocking Precision: Onocoy's Supported RTCM Messages
Discover how Onocoy supports RTCM messages, enhancing location accuracy.