
Automate Windows 11 Installation: Bypass TPM, Secure Boot, and RAM Checks
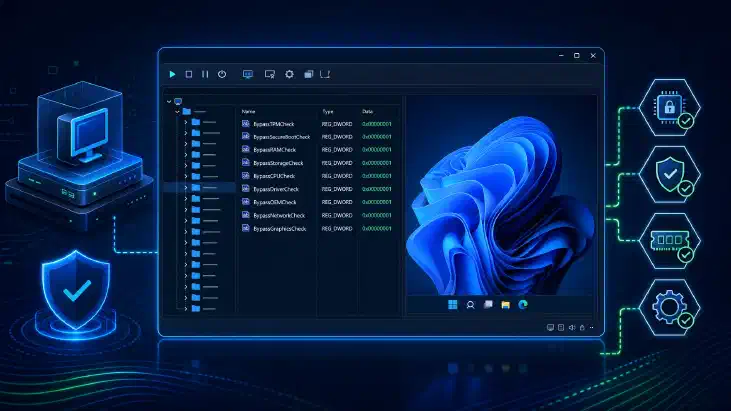
Table of Contents
Automated Windows 11 Installation in Virtualized Environments
Introduction
Windows 11 introduces new system requirements, including the need for a TPM (Trusted Platform Module), Secure Boot, and sufficient RAM. While these requirements enhance security and performance, they can pose challenges when installing Windows 11 in virtualized environments without native TPM support. However, there are workarounds to bypass these checks and install Windows 11 successfully.
Bypassing TPM, Secure Boot, and RAM Checks in Windows 11
Virtualized environments like VMware vSphere can use a virtual TPM ( vTPM ) to emulate a TPM 2.0 device, satisfying the TPM requirement for Windows 11 installation. However, for scenarios where a vTPM isn’t available, the following registry keys can be used to bypass the checks during the installation process:
- BypassTPMCheck: Skip TPM check.
- BypassSecureBootCheck: Skip Secure Boot check.
- BypassRAMCheck: Skip RAM check.
[HKEY_LOCAL_MACHINE\SYSTEM\Setup\LabConfig]
"BypassTPMCheck"=dword:00000001
"BypassSecureBootCheck"=dword:00000001
"BypassRAMCheck"=dword:00000001
To manually bypass the checks during a manual installation, follow these steps:
- When encountering the message “This PC can’t run Windows 11,” press [Shift]+[F10] to open a command prompt.
- Use the regedit command to open the Registry Editor.
- Manually add the aforementioned registry values under HKEY_LOCAL_MACHINE\SYSTEM\Setup\LabConfig with a value of dword:00000001.
# Create the LabConfig key if it doesn't exist
New-Item -Path "HKLM:\SYSTEM\Setup" -Name "LabConfig" -Force

# Set the registry values under LabConfig
Set-ItemProperty -Path "HKLM:\SYSTEM\Setup\LabConfig" -Name "BypassTPMCheck" -Value 1 -Type DWord
Set-ItemProperty -Path "HKLM:\SYSTEM\Setup\LabConfig" -Name "BypassSecureBootCheck" -Value 1 -Type DWord
Set-ItemProperty -Path "HKLM:\SYSTEM\Setup\LabConfig" -Name "BypassRAMCheck" -Value 1 -Type DWord
- Exit the command prompt and close any remaining dialogs to proceed with the setup.
Automated Installation using Autounattend.xml
For automated installations in virtualized environments, an autounattend.xml file can be used to specify configuration settings. To include the Bypass Registry Keys in the autounattend.xml file, use the RunSynchronous command as follows:
<?xml version="1.0" encoding="utf-8"?>
<unattend xmlns="urn:schemas-microsoft-com:unattend">
    <settings pass="windowsPE">
        <!-- Other settings -->
        <component name="Microsoft-Windows-Setup" processorArchitecture="amd64" publicKeyToken="31bf3856ad364e35" language="neutral" versionScope="nonSxS" xmlns:wcm="http://schemas.microsoft.com/WMIConfig/2002/State" xmlns:xsi="http://www.w3.org/2001/XMLSchema-instance">
            <RunSynchronous>
                <RunSynchronousCommand wcm:action="add">
                    <Order>1</Order>
                    <Description>BypassTPMCheck</Description>
                    <Path>cmd /c reg add "HKLM\SYSTEM\Setup\LabConfig" /v "BypassTPMCheck" /t REG_DWORD /d 1</Path>
                </RunSynchronousCommand>
                <RunSynchronousCommand wcm:action="add">
                    <Order>2</Order>
                    <Description>BypassSecureBootCheck</Description>
                    <Path>cmd /c reg add "HKLM\SYSTEM\Setup\LabConfig" /v "BypassSecureBootCheck" /t REG_DWORD /d 1</Path>
                </RunSynchronousCommand>
                <RunSynchronousCommand wcm:action="add">
                    <Order>3</Order>
                    <Description>BypassRAMCheck</Description>
                    <Path>cmd /c reg add "HKLM\SYSTEM\Setup\LabConfig" /v "BypassRAMCheck" /t REG_DWORD /d 1</Path>
                </RunSynchronousCommand>
            </RunSynchronous>
            <!-- Other components and settings -->
        </component>
        <!-- Other settings -->
    </settings>
    <!-- Disk configurations and other sections -->
</unattend>
Use Caution and Adhere to Regulations
Bypassing these checks should only be done in specific scenarios, such as virtualized environments that have appropriate security measures in place. You need to understand the implications of bypassing these requirements and assess the potential risks.
The need for TPM 2.0 and Secure Boot for Windows 11 installation is based on Microsoft’s stated system requirements. In some cases, such as in government or regulated environments, bypassing these checks may not be compliant with specific regulations or security standards. Organizations should carefully consider their requirements and consult applicable regulations, such as those from government agencies like the National Institute of Standards and Technology (NIST), to ensure compliance.
Conclusion
By following the steps outlined in this article, you can automate the installation of Windows 11 in virtualized environments and bypass the TPM, Secure Boot, and RAM checks using an autounattend.xml file. However, remember to proceed with caution and understand the potential consequences of bypassing these essential security and performance checks.
References
- VMware vSphere Documentation
- Enable Virtual Trusted Platform Module for an Existing Virtual Machine
- National Institute of Standards and Technology (NIST)
- Windows 11 – autounattend.xml – BypassTPMCheck – BypassSecureBootCheck
Related Posts